Settings Guide
Configure branding, customer tags, email templates, notifications, data export, auto-approval rules, and B2B settings in B2B Onboard.
Settings open on a grouped landing page organized into six groups — Plan & usage, Registration & branding, Communications, Legal documents, Tax & verification, and Integrations & automation — plus an Export data action. Open a group to reach the individual settings sections below (e.g. the Integrations section is reached via the Integrations & automation group).
Jurisdiction-specific sections are de-emphasised when your store’s billing country makes them less relevant — nothing is hidden. On a store outside the EU or UK, the Tax & verification group moves to the end of the page and renders collapsed under a one-line caption (“Relevant if you sell to EU or UK buyers.”); expand it any time to reach VAT Verification. Similarly, the Guarantee entry in Legal documents stays visible and clickable but shows the caption “Most relevant if you onboard US wholesale buyers.” on non-US stores. Every section remains reachable regardless of your store country.
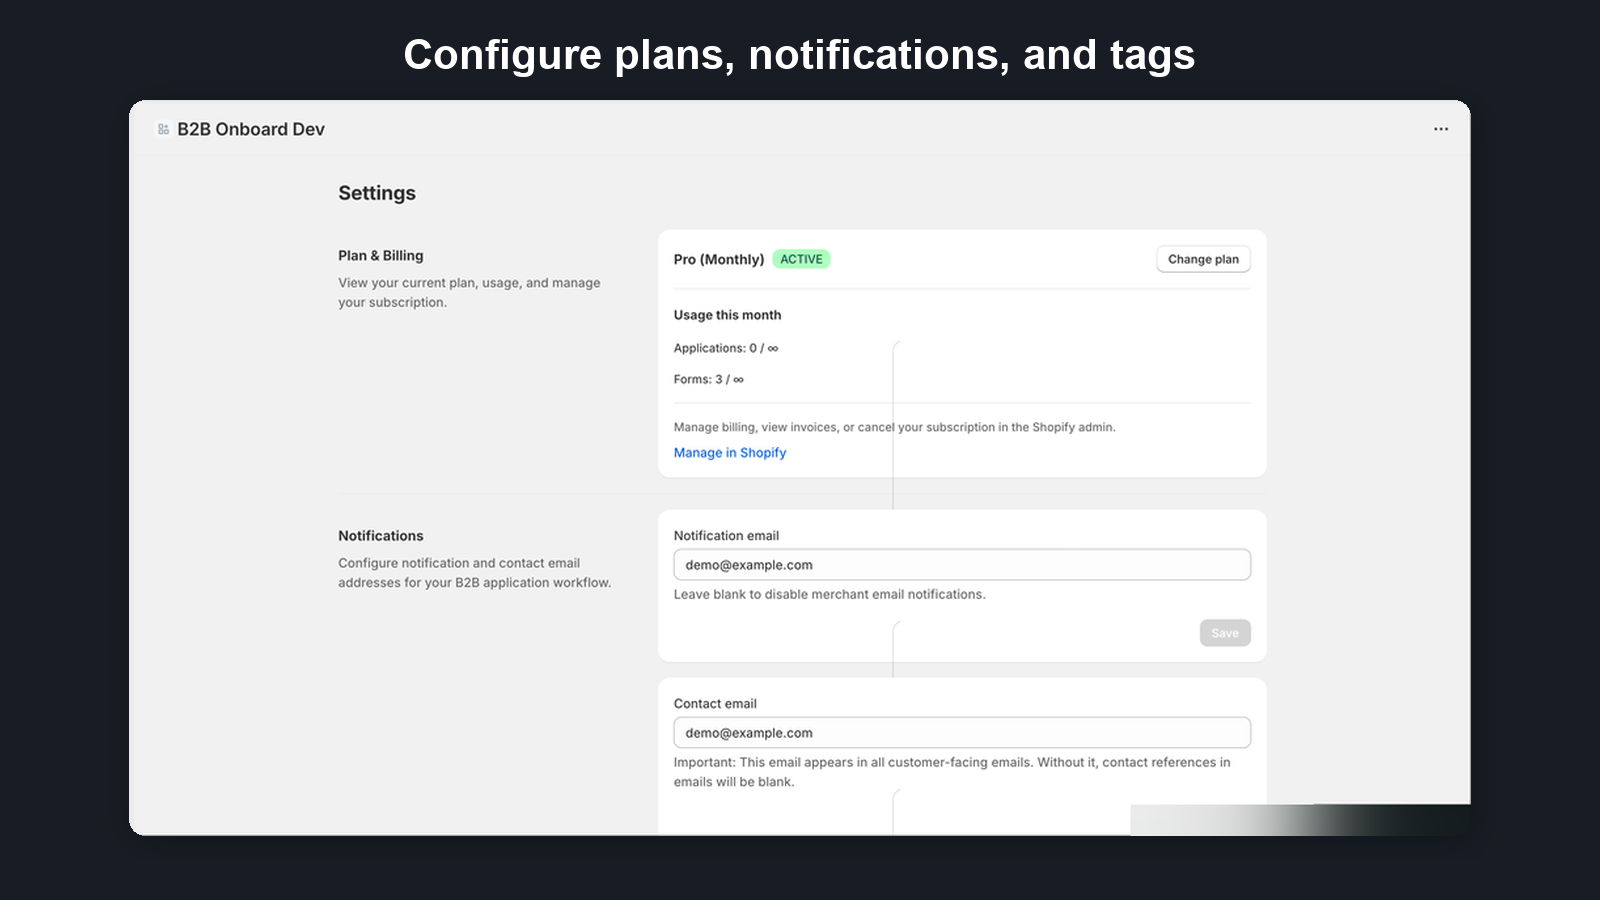
Plan
View your current plan, usage, and manage your subscription.
- Current plan: shows your active subscription tier and billing status
- Usage this month: applications submitted and forms created against your plan limits
- Manage in Shopify: link to manage billing, view invoices, or cancel your subscription in the Shopify admin
On the Free plan you will see an Upgrade button. On paid plans you can Change plan to switch tiers.
When you cancel your subscription or move to a lower plan from the app's Pricing page, we ask you to pick a short reason from a list first, with an optional comment box if you want to add anything. It takes a few seconds, and we use it only to improve the app. Cancelling from the Shopify admin instead (the Manage in Shopify link above) goes through Shopify's own billing screens and does not ask.
Notifications
Configure the email addresses and sender identity used for your B2B application workflow. There are five separate settings:
- Notification email: the address that receives alerts when new applications are submitted. If you leave it blank, we still make sure you hear about new applications — the alert falls back to the store owner (once they've opened the app), then to the last person to open the app, and then to your store's contact email. If an agency or freelancer manages your store, list every recipient here (the store owner included), separated by semicolons, so alerts don't go only to them. Set a shared inbox (e.g., wholesale@yourstore.com) to route these alerts to the right person on your team. You can also notify several people at once: separate the addresses with semicolons (e.g., owner@yourstore.com; sales@yourstore.com) — up to 5 recipients, each of whom receives their own copy of every notification.
- Contact email: the address shown in all customer-facing emails (approval, rejection, info request). Without it, contact references in emails will be blank. While it is unset, your Dashboard shows a reminder with a shortcut to this page. You can dismiss the reminder — it stays hidden while a contact email is set, and only comes back if the address is later cleared again.
- Sender name: the display name shown in the From field of all customer-facing emails (e.g., "Acme Wholesale"). Defaults to your store name. This brands the emails your customers receive; the underlying sending address (
noreply@mail.mentilead.com) is always unchanged to protect deliverability. - Weekly digest email: a Monday summary of the wholesale work waiting for you — applications to review, newly verified VAT/ABN/NZBN numbers, certificates and trade agreements awaiting action, pending credit requests, and submissions held in spam quarantine (which are removed automatically after 30 days if unreviewed) — plus a running tally of the customers you've onboarded, the time you've saved, and the tax IDs checked against official registries on your behalf. On limited plans it also flags applications held by your plan limit and your usage position once you pass 80% of your monthly allowance. It's only sent when you actually have pending work (held applications and quarantined submissions count as pending work), so an empty week means no email. Check Turn off the weekly digest email to stop receiving it.
- Weekly report email (Growth and Pro): tick Send me a weekly report of new applications to get last week's new applications at the start of every week (Monday morning, or Sunday where weeks start on Sunday, such as the US and Canada) for each registration form, with the breakdowns you chose under Reports → Breakdowns, compared with the week before. It contains counts only — no names or email addresses — and links to the full Reports page. It is off until you turn it on.
All of these settings share a single Save bar at the top of the Notifications page — make your changes and click Save once to apply them all together (or Discard to revert).
If alerts to your notification address stop arriving: when several new-application alerts in a row can't be delivered to your notification address, your Dashboard shows a warning banner. Nothing is lost — every application still appears in your Applications list. The quickest fix is usually adding the sending address (noreply@mail.mentilead.com) to your email contacts or safe-senders list; if that doesn't help, ask your email provider to allow mail from that domain, or switch to a different notification address on this page. The banner can't be dismissed manually — it disappears by itself as soon as an alert is delivered again. Separately, if alerts do arrive but land in your spam folder, open one and mark it Not spam so your mailbox learns to trust the sender (this situation doesn't trigger the banner, since the email was delivered).
Review Timeframe
Set an expected review timeframe (e.g., "1-2 business days") that is shown to applicants on the confirmation page after they submit their application. This helps set expectations about how long your review process takes.
Tip: For more control over what applicants see after submitting, configure the "What happens next" steps directly on each form in the form editor's Confirmation page section.
Email Templates
B2B Onboard includes thirteen email templates sent at different stages of the review process — five core templates, four merchant-only notices, and four feature templates that appear when you use credit applications, document requests, trade-agreement signing, or personal-guarantee signing. These five make up the core review flow:
- Application Received — Customer: sent to the applicant when their application is submitted
- Application Received — Merchant: sent to you when a new application is submitted
- Application Approved: sent to the applicant when their application is approved
- Application Rejected: sent to the applicant when their application is rejected
- More Information Requested: sent to the applicant when you request additional details
Two merchant-only usage notices are also listed here, each sent at most once per month on limited plans: Usage Limit Approaching — Merchant (when you cross 80% of your monthly application allowance, or earlier if your current pace projects you'll reach it) and Usage Limit Reached — Merchant (when the first application of the month is held behind your plan limit — it always spells out that nothing has been lost). Further templates for credit applications, document requests, and trade-agreement signing appear here when you use those features; they are described in their own guides.
High application volume
If your form receives an unusual burst of applications, you do not get one alert per application. Once more than 10 applications arrive within the same hour, the individual Application Received — Merchant alerts pause for the rest of that hour and you receive a single Application Digest — Merchant email instead, telling you how many arrived. Individual alerts resume automatically at the start of the next hour. Nothing is dropped — every application is recorded and waiting in Applications, exactly as submitted. You can edit the digest wording like any other template.
Application Updated — Merchant is sent to your notification address when an applicant updates their application from the link in the More Information Requested email. It names the company, lists which answers changed ({{changedFields}}) and how many times they have updated it ({{revisionCount}}), and links to the application, which is back in your queue as pending. The More Information Requested — Customer template carries that link as {{reviseUrl}}; if you customised it before the link existed, a one-time banner on this page asks you to add it.
What applicants can put in your emails
Applicant-entered details such as the company name and contact name are placed into emails as plain text: any links, HTML, or formatting typed into a form field are removed before the email is sent, so a submitted address never becomes a clickable link in your inbox or in an applicant’s. If a submission contains that kind of content, that one email is replaced with a short neutral version that leaves the submitted wording out entirely — the alert still reaches you, with your usual link to the application. The full submission is always readable in the Applications section of the app, unchanged. This is decided one email at a time, and it applies to your own customized templates too: when a submission trips it, that single email is sent using the short neutral version instead of your wording. Your template itself is never changed — it stays exactly as you wrote it in Settings and is used again for the very next clean application, links and all. A company name that is only a plain domain such as acme.co.uk, with nothing else in the field, is not treated as a link — that is a business trading under its domain, so the name is kept and shown as ordinary text and the email sends in full, exactly as your template is written. A full web address is still treated as a link, so a company name written as https://acme.co.uk or acme.co.uk/shop gets the short neutral version described above. A domain written inside a longer company name (for example Brand&brand.se), with no https://, www. or path, is also kept as plain text that mail apps do not turn into a link; full web addresses, paths and addresses with @ still get the neutral version.
Each template can be customized with a custom subject line and body, and can be individually enabled or disabled. A preview shows how the email looks before you save changes.
Answers in your new-application alert. The merchant notification can include any answer from your form as {{fields.question_label}} (the question's label in lowercase with underscores, e.g. {{fields.company_size}}), and {{fields.all}} lists every answer. An address question also provides {{fields.question_label_country}}, {{fields.question_label_city}} and {{fields.question_label_zip}}, so the buyer’s country can sit in the subject line on its own. Put the two or three answers that decide priority in the subject line so you can triage from your inbox. Answers are placed as plain text — links, HTML and formatting typed into a form field are removed, exactly as for the company and contact names. One exception for answers: a bare website address such as https://acme.com/ is shown as just the domain (acme.com) and the alert sends in full. Anything longer, such as https://acme.com/shop, is still removed.
Email branding (all paid plans, opt-in) — your applicants keep receiving today’s plain emails until you save Settings → Email branding once; from then on every email they receive is wrapped in a shell with your logo (store logo by default), one accent colour for links, a tested light/warm/neutral background, your company or legal details (registered office, organisation and VAT numbers — Germany and Sweden require them on business email) and up to four text links. The preview on the right renders the exact HTML we send; dark mode is simulated as Apple Mail shows it (Gmail and Outlook apply their own dark styles). Internal notifications to you stay plain, and Reset to defaults returns applicants to plain emails. Upload PNG or JPG logos under 200 KB — SVG is not supported by most mail apps.
White-label emails (Growth plan and above): remove B2B Onboard branding from all outgoing emails so they appear to come directly from your store. White-label removes the "Powered by B2B Onboard" footer from all outgoing emails, so they appear to come entirely from your store.
Languages (Growth plan and above)
Send your buyer-facing emails in your applicants’ own language. In the Languages card, pick a language under Add language (41 languages available) and click Add language. The seven buyer-facing emails are translated instantly from a built-in translation pack — no API keys, no waiting, no per-translation cost.
Emails you have customized are not translated automatically. The built-in pack only covers the standard wording, so if you have edited a template’s subject or body it is skipped rather than replaced with a translation of wording you no longer use. A banner names exactly which ones were left untranslated ("Customized emails were not translated automatically"), and those emails keep sending in your default language until you translate them. You can write any translation yourself on Growth or Pro. On Pro, Translate automatically (or Re-translate) on each card translates your own wording for you.
Every automatically produced translation carries a Machine-translated badge and a reminder to review it before you rely on it — machine translation can get tone, product names, or legal nuance wrong, so read each one before buyers do. Editing and saving a translation clears the badge: your edit marks it as reviewed by you.
Use Editing language to work on one language at a time. Only buyer-facing emails can be translated — merchant notifications (your new-application alert and the two usage notices) always stay in your default language. Each language version has its own Send this email in this language checkbox; switch it off and that email falls back to your default language. Whether a stage sends at all is still controlled by Enable this email in the default-language view. Remove this language deletes that language’s translations.
Which language an applicant gets. At send time we use the language the applicant filled the form in; if we don’t know it, your store’s default form language; and if there is no translation for either, English — falling back to your default template whenever a translation is missing or switched off.
How plan-gated features look on a lower plan. Nothing is ever hidden from you. When a feature needs a higher plan — white-label emails, email translations, CSV data export, certificate refresh reminders, credit document auto-request, credit risk signals, the trade agreement, or the personal guarantee — the card stays on the page, showing its name, a plan badge (for example Growth plan), a one-line description of what it does, and a single Upgrade button that takes you to the pricing page. The feature's settings and controls appear as soon as your plan includes it. One exception by design: on Growth, the Pro-only automatic translation of your own wording is not a locked card — the translation card stays fully editable and simply carries an inline hint ("Automatic translation of your own wording is a Pro feature.") next to an Upgrade to Pro link.
Previewing templates
Click Send preview to myself on any template to receive a sample rendered email at your notification address — useful for checking formatting after edits. Previews bypass the normal SQS queue and include sample values for every variable, with a [PREVIEW] note at the top so there’s no confusion if you forward the email.
Images in Emails
Insert image (Starter plan and above) sits under the body of every template. Images you have uploaded before are listed under Your email images below the upload box (with your store logo) so one click inserts them again — no second upload. Choose a PNG or JPG under 500 KB, add a short alt text describing it for readers who can’t see images, and the picture is uploaded to your own Shopify Files and added to the end of the body as a single line, for example . Move that line to wherever you want the image to appear — it must stay on its own line, with nothing else on it, and it sends full width inside the email. The preview on each card shows the real email, so you can see exactly where the image lands before you save. The alt text lives in the square brackets of that line, so you can edit it per email straight in the body — the library only remembers your last wording as the default for the next insert.
Only images uploaded here are shown. Mail apps fetch pictures when the buyer opens the message, often days later, so an address copied from somewhere else is usually dead by then — any other URL is left in the email as plain text instead of a broken image. SVG files are not supported by most mail apps. Images you have already inserted keep sending on every plan, including if you later move to the free plan; only adding a new one needs Starter or above.
Customer Tags
Configure tags that are applied to Shopify customer accounts when applications are approved. Tags come from two sources and are merged additively:
- Approved tags: a shop-wide comma-separated list applied to every approved customer (e.g.,
wholesale,b2b-approved) - Per-option tags: each option on a select or multi-select form field can have an optional Customer tag. When an applicant selects that option and the application is approved, the tag is applied to their Shopify customer account. Configure per-option tags in the Form Builder's field editor.
Existing tags on a returning customer are preserved — tags are added additively on re-approval, never removed. Tags are matched case-insensitively, so VIP and vip are treated as the same tag.
Tags are useful for automatic discount rules, customer segments, and Shopify Flow automations.
B2B Company Creation
Automatically create or match Shopify B2B Companies when applications are approved. Available on any Shopify plan with native B2B enabled.
Shopify B2B is included on the Basic, Grow, Advanced and Plus plans (not Starter), and it needs the new customer accounts — a store still on legacy customer accounts has no B2B until it switches in Shopify admin → Settings → Customer accounts. When B2B isn't available, this page tells you what's missing; after changing your Shopify settings, click Check again to re-check without waiting for the daily refresh.
- Company matching: control how new applications are matched to existing Companies using multiple signals
- Default catalog (Shopify Plus): select a B2B catalog to assign to new Companies automatically
- Default B2B market (Basic, Grow, Advanced): select the B2B market whose catalogue and pricing your wholesale buyers should see. On approval, the new Company's location is added to that market, so the buyer sees wholesale prices at first login without you adding them by hand in Shopify admin. A market that already applies to all company locations is labelled as such and needs no assignment. A form rule can also assign a market per application (Forms → Rules → Assign B2B market) — the precedence is a market chosen on the Approve page, then the matching form rule, then this default.
- One-time shipping addresses: whether buyers at a new company location may enter a delivery address at checkout that is not one of the location's saved addresses. "Use Shopify's default" leaves the setting untouched; the Approve page can override it per application.
- Reviewer fields: the metafields your team fills in by hand on the Approve page — ERP or integration fields that are not questions on your form. Pick definitions from the searchable list, put them in the order you want to see them in with the up and down arrow buttons on each row, and give any of them an optional Default. A field that is also mapped from a form question is pre-filled with the applicant's answer, which the reviewer can change for that approval only. Defaults are also applied by bulk, automatic and Flow approvals; fields without a default are skipped there. This list is available on stores without company creation too — there it offers Customer metafields only, because no Company or Company location is created.
- Auto tax exempt: apply the matching Shopify tax exemption automatically when a VAT number or a resale / tax-exemption certificate is verified — EU/UK reverse charge for verified VAT, and for US resale certificates a state-scoped reseller exemption covering only the certificate's states, and for Canadian BC/SK/MB reseller certificates a provincial sales tax (PST/RST) reseller exemption covering only the certificate's provinces — only the provincial sales tax line on orders to a covered province is removed, and GST/HST is still charged on every order (see the Certificates Guide)
This section only appears when native B2B is available on your store. If B2B isn't accessible on your plan, this section is hidden automatically.
If your store supports native B2B but automatic company creation is not yet enabled, a prompt appears on the Setup Guide on your dashboard — click Enable now to come straight here, or Not now to snooze the reminder.
Company matching signals
The matching system evaluates three independent signals when reviewing an application. Enable or disable each signal individually:
- Match by VAT / Tax ID (high confidence) — checks whether the applicant's VAT number appears in an existing company contact's notes. This is the strongest signal. When enabled, you can choose between two behaviours:
- Suggest on review page only (default) — the matching card on the application detail page highlights the match, but you decide whether to add the applicant to the existing company or create a new one.
- Auto-match on approval — when a high-confidence VAT match exists, the applicant is automatically assigned to the existing company on approval without prompting. The match is still shown on the review page for transparency.
- Match by email domain (medium confidence) — compares the applicant's email domain against email domains of contacts in existing companies. Freemail providers (Gmail, Yahoo, Hotmail, etc.) are automatically excluded so they never produce a false match.
- Match by company name (low confidence) — performs an exact case-insensitive comparison of the applicant's company name against existing company names.
Multiple matching signals compound: a name match combined with an email domain match produces medium confidence; any combination that includes a VAT match produces high confidence.
Disable all matching
Check Disable all company matching to turn off all three signals at once. When matching is disabled, a new B2B Company is always created on approval — equivalent to the previous “Always create new” setting.
Shopify plan tiers
Shopify rolled out foundational B2B to Basic, Grow, Advanced, and Plus on April 2, 2026. What you get depends on your Shopify tier:
- Basic, Grow, Advanced: company profiles, contacts, locations, payment terms, volume pricing, ACH (US), vaulted credit cards, and up to 3 B2B catalogs assigned via Shopify Markets.
- Shopify Plus: everything above plus unlimited catalogs, direct catalog assignment to specific companies and locations, partial payments, and deposits.
B2B Onboard's approval-to-Shopify-Company flow works on every tier, but the two tiers reach wholesale pricing by different routes. On Basic, Grow, and Advanced, assigning a catalog directly to a company location is a Shopify Plus entitlement, so B2B pricing flows only through a B2B market: choose a Default B2B market and the app adds the approved Company's location to it on approval. On Shopify Plus, the app assigns the Default catalog to the Company's location directly instead. The two settings are mutually exclusive — you only ever see the one your plan can use.
If the assignment fails (for example, the 3-catalog limit has been reached, or the market no longer exists), the approval still completes and you see a “Catalog not assigned” or “Market not assigned” warning on the success message — the Company is created and you can add the location to the catalog or market manually in Shopify admin.
Blocked Applicants
Settings → Blocked applicants is your own list of senders you never want in your queue again. An entry is either one email address or a whole domain written as @company.com. Free email providers such as Gmail, Outlook or Yahoo can't be blocked as a whole domain, because unrelated customers share them — block the individual address instead. Address variants that reach the same mailbox are treated as one (capital letters, a +tag, and dots in a Gmail address), and a domain entry covers that exact domain only, not its subdomains. You can block up to 500 entries, on every plan.
Nobody is ever blocked automatically — rejecting an application never blocks anyone on its own. Entries get onto the list in three ways: tick Block this email address from applying again on the Reject dialog of an application, tick Also block these senders when you delete submissions from Quarantine, or add an address or domain on this page with an optional reason. Each entry shows who blocked it and when. Remove an entry with its delete button and save to unblock the sender — this page is the only place to unblock.
A submission from a blocked sender is not turned away and the sender is not told: it is held in Quarantine with a Blocked sender explanation, and like every hold it is removed automatically after 30 days if you leave it. If you blocked someone by mistake, Not spam restores the submission — but restoring does not unblock the sender, so remove the entry here as well. When Shopify sends a customer data erasure request for an address on the list, that address is removed from the list; domain entries stay.
Branding
Upload your company logo to display at the top of registration forms (available on all plans). Accepts .jpg, .png, .svg — recommended size: 200x60px.
On first install, B2B Onboard auto-detects your store's logo and primary color from your storefront and theme and saves them to your branding settings. The detected logo and color render on your registration forms automatically on every plan. You can override them anytime by uploading a different logo or adjusting colors in the Form Builder's Style tab.
The logo appears on all registration forms automatically once saved.
Color and styling configuration is done per-form in the Form Builder's Style tab — see the Form Builder Guide.
Data Export
Download your data as CSV files and PDFs for reporting, backup, record-keeping, or integration with other tools. Available on Starter plan and above.
The export is a ZIP file that includes:
- Forms and their configurations
- Applications with all submitted field values and status, including who signed the trade agreement, which version and when (
applications.csv) - Timeline events (status changes, notes)
- The files buyers uploaded with their applications (
documents/) - An index of every signed trade agreement, with its status (signed, out of date, void, or superseded when a later re-sign of the same version replaced it), the path of its PDF in the ZIP, and a
retained_after_redactioncolumn that istruewhen the customer asked for erasure and the signed record was kept (signed_records.csv) - Credit applications as the buyer submitted them, including the wording they accepted (
credit_applications.csv) - The signed trade agreement PDFs, by company and version or by application (
signed-records/) - The signed personal guarantee PDFs, by company, credit application and guarantor (
guarantees/) - Settings (tags, notification emails, branding)
Signed records and credit applications are included in the Applications Only and All Data exports. Each signed record in signed_records.csv carries two fingerprints (SHA-256): content_sha256 for the agreement content and file_sha256 for its PDF. To check a copy you keep, compare them with the Record column on the Signed records page, or drop the PDF into Verify a file on that page.
Exports are generated asynchronously in the background. Once ready, you will receive a download link. Export files are available for download for 7 days after generation.
A spreadsheet of one form’s applications (one row per application, one column per question) is requested from Reports → Export CSV (Growth and Pro, see the Applications guide); it appears under Recent exports here as “Applications spreadsheet”.
Automations
Connect B2B Onboard to your existing workflows using Shopify Flow.
- Triggers (all triggers fire on every plan; the richer fields need Growth or Pro): Registration Submitted, Approved, Rejected, Information Requested, Quarantined, Restored and Released; Certificate Updated; Tax Exemption Updated; Credit Updated; Agreement Signed
- Actions (Growth plan and above): Approve Registration, Reject Registration, Tag B2B Customer, Add Internal Note
- Certificate download links (Growth plan and above, off by default): include a signed, time-limited download link for each tax certificate in the Approved trigger so your own workflow can fetch the files. Choose how long links work (1 to 168 hours, 24 by default), and use Revoke all links now to stop every link already sent. Turning the setting off also revokes every link already sent. Links appear in Shopify Flow’s run history for 14 days, where staff with Flow access can see them, so only send them to systems you trust. See Certificate download links.
Copy Flow notes to the company (Growth plan and above, off by default): when your workflow adds notes with the Add internal note action and a Note key (for example background_check), turn on On approval, copy the latest note with this key to a company metafield and enter the Note key, a Namespace and a Key (by default custom.background_check). The note’s text is written to the Shopify company as a multi-line text metafield when the application is approved, and updated whenever your workflow adds a newer note with the same key. The b2b_onboard namespace is reserved for B2B Onboard’s own company fields. Namespaces starting with shopify or app-- can’t be used either; a namespace needs at least 3 characters and a key 2–64 (letters, numbers, _ and -). See Adding Internal Notes from Flow.
For example, you can auto-tag approved customers as "wholesale", send a Slack notification to your sales team, or send tax certificates to your ERP with the ready-made template — all without writing code. See the Shopify Flow Guide for step-by-step setup.
Integrations
The Integrations card in Settings shows which customer metafields B2B Onboard writes on approval and which invoicing apps are compatible.
Metafields written: custom.company_name, custom.contact_name, custom.vat_number, and custom.tax_id. custom.tax_id holds the tax answer whenever the form asks for a tax ID; custom.vat_number holds the same answer unless it is known not to be a VAT number: a buyer in the US, Canada, Australia or New Zealand, an ABN, NZBN or Canadian business number, or a Norwegian organisation that is not VAT-registered. These use the standard custom namespace so third-party apps can auto-discover them.
Signed record metafields: when a signed trade agreement is approved, re-signed from the company’s Agreement card or voided, B2B Onboard records which signed record belongs to the Shopify company and customer. On the company: b2b_onboard.agreement_record_id, b2b_onboard.agreement_status, b2b_onboard.agreement_version, b2b_onboard.agreement_signed_at, b2b_onboard.agreement_signers, b2b_onboard.agreement_content_sha256, b2b_onboard.agreement_file_sha256, b2b_onboard.agreement_record_url. On the customer: b2b_onboard.agreement_record_id, b2b_onboard.agreement_status, b2b_onboard.agreement_signed_at, b2b_onboard.agreement_record_url. agreement_record_id is the application pack id (or legacy:<version> for a record signed before application packs). agreement_status is signed, out_of_date (signed on an earlier version than the one you publish) or void; it reflects the last signing event, so publishing a new version does not change it until the company signs again. The two fingerprints match the Record block in the app, and agreement_record_url opens the record in B2B Onboard. The signer’s name and position are recorded; email addresses are not.
Compatible apps: Sufio, Order Printer, Billbee (via Flow workaround), and any app that reads customer metafields.
The metafields card is read-only — there is nothing to switch on or off here. What happens on an individual approval can still vary: if an answer is not a value Shopify will accept, the Approve page blocks the approval until you fix the answer or approve without those specific keys, and a value Shopify rejects at write time leaves the application with a Retry metafield writes action. See the Integrations Guide for setup instructions per app.
Credit risk signals (Growth/Pro): Below the metafields and address-autocomplete cards, the Integrations page has a Credit risk signals section. Credential entry appears only for providers B2B Onboard has a live integration with — currently Experian Business. Enter your own API credential fields and save with the page save bar; once connected, you can pull a third-party risk signal on a company's Credit card, and Disconnect removes the credential immediately.
Coming-soon providers: Dun & Bradstreet, Creditsafe, Atradius, and Allianz Trade appear as coming soon cards with no credential fields, because those integrations are not built yet. Each card has a Register interest button that asks one question — whether you are already a customer of that provider (yes / no / not sure). We use those answers to decide which provider to wire up next; there is no delivery date attached to registering interest, and you can change your answer at any time.
Any credit signal is advisory only — it never scores creditworthiness, suggests a limit, or approves/declines anything; the decision stays yours. Your credential is encrypted at rest and stored only for your store; you hold the credential and the permissible-purpose (US FCRA) / lawful-basis (GDPR) responsibility for each lookup. See the Credit Applications Guide for details.
VAT Verification
Configure your business VAT number so that each VIES lookup returns a consultation number — the unique reference required under Council Regulation (EU) No 282/2011, Article 18 as documented proof that you verified your customer’s VAT status at the time of supply. Stronger audit evidence than an uncorroborated VIES lookup.
- Your country code: the EU member state (or GB) where your business is VAT-registered.
- Your VAT number: your full VAT registration number in the standard format for your country (e.g.
DE123456789).
Both fields must be filled together. Leave both blank to clear the configuration. When unset, VIES will still validate customer VAT numbers — you just won’t receive a consultation number for your audit trail. If any of your forms contain a Tax ID / VAT field but the business VAT number is not yet configured, the Customer Tags page will show a reminder with a shortcut to this section. If your store is based in the EU or the UK, the same reminder also appears on your Dashboard. You can dismiss the dashboard reminder — it stays hidden while your business VAT number is configured, and only comes back if the configuration is later cleared.
B2B Onboard uses VATsense as a paid fallback when the EU VIES API is temporarily unavailable. If VIES cannot be reached, VATsense validates the VAT number automatically — no action needed from you. VATsense validation counts as full VAT verification for the purposes of tax exemption: a successful VATsense result is treated identically to a successful VIES result.
When neither service is reachable, the application is accepted with a VAT pending status and automatically retried up to five times with exponential backoff (5 minutes → 30 minutes → 2 hours → 12 hours → 24 hours). After the third failed retry attempt, your notification email address will receive an alert with a direct link to the application.
While VAT verification is pending, you can force approve an application from the application detail page — this records the override in the audit log and marks VAT as unchecked so it can be re-verified later. Once VIES recovers, applications previously verified via VATsense are automatically rechecked against VIES in the background to capture an official consultation number for your audit trail.
When you save your business VAT number, B2B Onboard runs a live check against VIES so typos are caught immediately instead of surfacing later as missing consultation numbers in your audit trail. If VIES confirms the number, the save proceeds normally. If VIES does not recognise the number, the save is rejected with an error message so you can correct it. If VIES is temporarily unreachable, the save still succeeds with a notice that verification will be applied on the next customer submission. Use the Save without VIES check button to bypass the live check entirely — useful when you know the number is correct and VIES is consistently unavailable.
Agreement
The Agreement page (Growth and Pro plans) lets you require buyers to accept or sign your wholesale trade agreement as a condition of approval. It has its own page under Settings › Legal documents, with Publish new version as the main action instead of a save bar — publishing a legal version is deliberately a separate, explicit step.
- Upload terms: publish your agreement as a PDF with a version label (e.g.
v1). Each publish is kept as an immutable version. - Require for approval: when on, an application cannot be approved until the buyer has accepted the current version. When off, acceptance is optional.
- Require a second signer: when on, the buyer names a second signer (a Director or the Company Secretary) who gets their own signing link, and the agreement completes only after both have signed. A first signer who is the Sole Director or the Owner / Proprietor is exempt — one signature completes the agreement as usual.
- Someone else signs: a buyer can name someone else to sign the agreement on the company’s behalf; that person is emailed their own signing link.
- Publish a new version: companies that signed an earlier version are marked out of date and surfaced on the Action required worklist for re-signing.
- Discard staged changes: a version label or attached PDF is not saved until you publish. While something is staged, a Discard button appears next to Publish, and leaving the page asks you to confirm before clearing it.
- Version history: every published version stays listed on the page — newest first, with its version label, file name, publish date, who published it, and a Current badge on the version in force. Each row has its own Preview link, so you can always reopen the exact terms a buyer signed.
Buyers accept through a secure link (click-to-accept plus an optional drawn signature), select their position and confirm they are authorised to sign for the company; the app records the signer name, position, that declaration, version, timestamp, and IP, keeps a generated signed PDF (which prints the position and declaration) on the company’s Agreement card, and stores a fingerprint (SHA-256) of the signed PDF. B2B Onboard does not write or assess legal wording and does not opine on enforceability — see the Trade Agreement Guide for the full workflow.
Guarantee
The Guarantee page (Growth and Pro plans) is where you publish the personal-guarantee wording a guarantor signs alongside a credit application, plus a separate FCRA written-authorisation text that is requested from buyers based in the United States. Like Agreement, it has its own page under Settings › Legal documents and uses Publish new version as the main action instead of a save bar. It is most relevant if you onboard US wholesale buyers.
- Upload the documents: a publish needs a version label plus your personal-guarantee wording PDF. The FCRA written authorisation PDF is requested from buyers based in the United States, when your published guarantee includes one: US stores must include one; other stores can add one (optional) for their US buyers, or publish the wording alone. Publish is unavailable until everything required is provided.
- Discard staged changes: nothing is stored until you publish. While a label or either PDF is staged, a Discard button appears next to Publish, and leaving the page asks you to confirm before clearing it.
- Version history: every published version stays listed — newest first, with its label, file names, publish date, who published it, and a Current badge on the version in force. Each row has its own Preview guarantee and Preview FCRA links (Preview FCRA only on versions that include it), so you can always reopen the exact wording a guarantor signed.
A guarantor signs through a secure link; the app records the acceptances (guarantee, plus FCRA for buyers based in the United States when your version includes it) with the signer name, version, timestamp, and IP, and keeps a generated signed PDF. The wording is yours — B2B Onboard does not write or assess legal wording, does not pull credit, and does not score or decide — see the Personal Guarantee Guide for the full workflow.
Test mode
Test mode (Growth and Pro plans) lets you and your staff go through your own registration form as a buyer would, before real customers see it. You find it under Settings › Legal documents › Test mode. A submission made through a test link is a test run: it is recorded separately from your applications, and nothing is created in Shopify — no customer, no company. Test runs do not count towards your monthly application allowance.
- Turn it on: tick Turn on test mode and save with the save bar at the top of the page.
- Create a test link: choose the form (your default form is preselected) and click Create test link, then Copy. You need to be signed in as a staff member, because the link is tied to your email address. A link works for 7 days and can be used more than once — every submission is its own test run. Anyone opening it sees a test-mode banner on the form and on the thank-you page.
- Emails go to staff only: every email of a test run is marked
[TEST]. The applicant confirmation goes to the staff member who created the link, and the new-application alert goes to your notification address(es). Nothing is ever sent to the email address typed into the form. If your settings send the credit application or the trade agreement link after a registration, those links are also emailed to the staff member who created the test link, not to the address typed into the form. - Signing the trade agreement in a test run: the signed test pack carries “TEST – NOT BINDING” on every page and a record id that starts with
TEST-, so it can never be mistaken for a signed agreement. A named signer or a second signer in a test run is emailed at the staff address that created the test link, never at the address typed into the form. - Stop links: Revoke all test links stops every link at once and keeps test mode on. Turning test mode off also stops every test link you have created. A stopped link opens your normal form without the banner — a submission through it is a real application.
- Clean up: test runs, and any files uploaded during them, are deleted automatically after 30 days. The Test runs card shows how many you have; Purge all test runs now deletes them straight away. Purging stays available after a plan change, so you can always clean up.
Test runs page: go to Settings › Legal documents › Test runs (it is not in the app menu), or click View test runs on the Test mode page. The list shows each run’s company, applicant, credit application, agreement record id (TEST-…) and expiry date. View opens a run: the answers the buyer entered, the credit application, the trade agreement with Preview and Download of the signed test pack, and the run’s timeline. Simulate approval (Growth and Pro) is a report of what a real approval would create or change in Shopify — the customer, the company and its location, catalog or B2B market, metafields, tax exemption, signed-record details and credit application — plus anything that would stop the approval. Nothing is written to Shopify, and the simulation is added to the run’s timeline. Purge (on the list) or Purge this run deletes a single run straight away.
The Setup Guide on your dashboard shows a Run a test signing step once test mode is on and you have published a trade agreement; it is ticked off after your first test run.