Getting Started
Set up B2B customer registration for your Shopify store in 5 minutes.
Welcome to B2B Onboard
B2B Onboard adds a professional B2B customer registration and approval workflow to your Shopify store. Customers fill out a registration form, you review their application, and with one click you can approve or reject them — creating a Shopify customer account automatically.
No theme modifications required. No code to write. The registration form runs through Shopify's App Proxy, so it lives on your storefront domain without touching your theme files.
Installation
- Find B2B Onboard in the Shopify App Store
- Click Install and authorize the requested permissions
- You'll be redirected to the app's Dashboard inside your Shopify admin
That's it — the app is installed and ready to configure. A default registration form is created automatically.
Quick Start (5-Minute Setup)
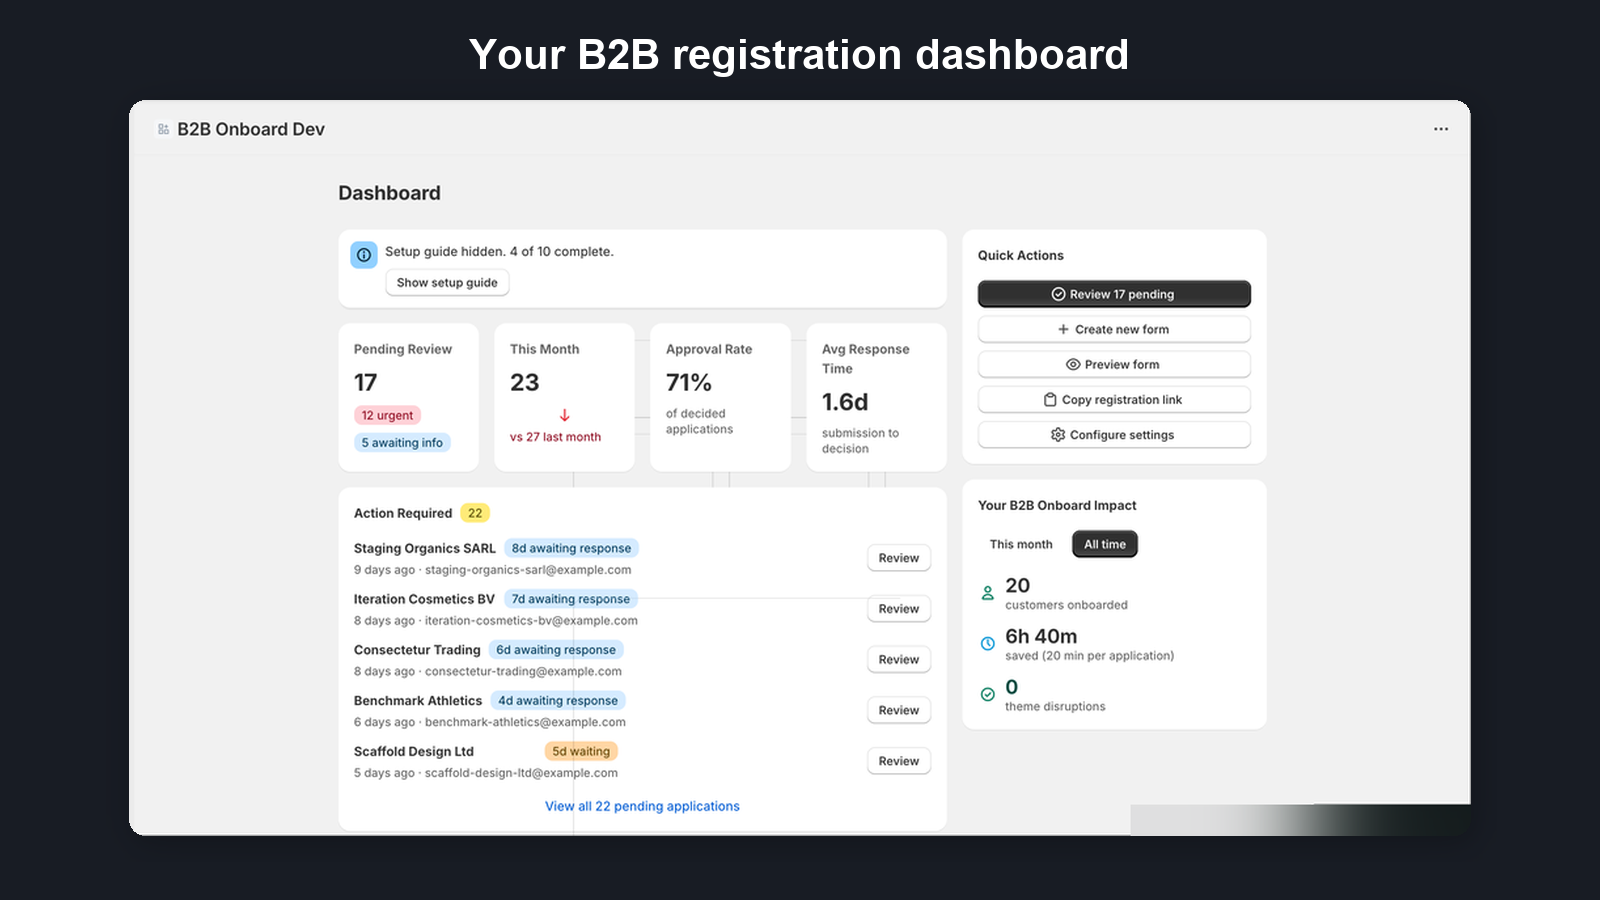
On first install, a three-step setup wizard walks you through going from installation to accepting your first B2B customer:
- Welcome, confirm your country & pick your form language — We greet you, confirm the country your store is based in (detected from Shopify), and ask for your form's default language, pre-selected from that country (a German store sees Deutsch suggested). Every plan — including Free — ships with this one language: the built-in language pack translates your whole form instantly, and buyers whose browser language isn't available see the form in your default language instead of English. The detected country also decides which market the next step's preview opens on — your buyers still choose their own country on the form.
- Preview your adaptive form & confirm notifications — Your default form is already built and ships ready to use. Switch the buyer's country and watch the form adapt live — an EU or UK buyer is asked for a VAT ID, an Australian buyer for an ABN, a New Zealand buyer for an NZBN, a US buyer sees a reseller-certificate upload, and everyone else gets a lean form. In the same step you confirm the email address that should receive new-application alerts — you can enter several addresses separated by semicolons (up to 5), and each recipient gets their own copy; we send a test email so you know it works. If you are setting the store up as a collaborator or staff account rather than the store owner (an agency or freelancer, say), the field starts empty and asks who at the store should receive new applications — enter the owner or wholesale manager, and add yourself alongside if you will handle approvals too.
- Share & verify your link — Your form is live at
https://your-domain.com/apps/wholesale-register, using your store's own primary domain (if your store hasn't set a custom domain yet, the link uses youryour-store.myshopify.comaddress instead). Copy the link, download the QR code, or add the link to your Shopify storefront navigation. If you would rather show the form inside one of your own pages, go to Online Store → Themes → Customize, open a page template, choose Add block and pick “B2B registration form” — the same hosted form is displayed inside the page, and removing the block removes it again. The block also has an optional Thank-you page setting: pick any page you have built in your theme and a buyer who submits the form successfully is taken straight to it — your own layout, copy and imagery, on your own page — instead of seeing our built-in confirmation. Leave it blank and the built-in confirmation is shown exactly as before. No theme file is edited either way. A one-click "Check installation" button verifies the link is reachable and marks it verified so the Setup Guide's link step auto-ticks. The step also ticks on its own once a buyer applies through your storefront — that's proof the link already works. This is also where you can match your registration page to your store's brand — and where a Create sample application button lets you try the full review-and-approve flow right away with a demo submission.
Once the wizard is done, you'll land on the dashboard. When customers submit the form, they'll appear in Applications — approve or reject with one click.
If your store supports native Shopify B2B (available on every paid plan), automatic B2B company creation is on by default for new installs: approving an application also creates a B2B Company, Location, and Contact so the buyer can place wholesale orders right away. You can turn this off — or back on — anytime in Settings → B2B Company, and the wizard lets you opt out before you finish.
If your store has been installed for more than 48 hours and you haven't received any applications yet, the dashboard shows a reminder banner prompting you to share your registration link. Use the Copy link action to copy the proxy URL, or dismiss the banner if you've already shared it elsewhere.
Until you've confirmed where new-application alerts should go, the dashboard also shows a notification banner pre-filled with the address we'll use (your configured notification email, else the store owner once they've opened the app, else the last person to open the app). Edit it if needed — multiple addresses work too, separated by semicolons (up to 5) — and click Confirm & send test to receive a one-off test email so you know alerts arrive — or dismiss the banner. If that address is a shared inbox like info@, the banner suggests using a personal address so alerts aren't missed. If it belongs to a staff or collaborator account that isn't the store owner — typically the agency that installed the app — the banner warns you and asks you to add someone at the store to the list, so alerts don't quietly stop after a handoff. (Merchants who complete the setup wizard confirm this in the wizard instead and won't see the banner.)
When the store owner opens an app that a collaborator or agency set up for them for the first time, the dashboard shows a handoff summary above the Setup Guide — who configured the store, how many registration forms are active, where notifications go, whether B2B company auto-create is on, whether the registration link is live, and how many applications are waiting — together with the single next action worth taking. The owner also receives a short welcome email covering the same ground. Nothing the agency configured is changed or reset; the summary simply hands it over, and you can dismiss the card once you have read it.
Later on, if several new-application alerts in a row can't be delivered to your notification address, the dashboard shows a delivery warning banner. Your applications are unaffected — they all remain visible in the Applications list — and the banner clears itself automatically once an alert gets through again. See the Notifications settings guide for the quick fixes (safe-senders list, provider allowlisting, or changing the address).
Dashboard Setup Guide
The dashboard shows a Setup Guide card that tracks your progress toward going live. It appears once you have finished the onboarding wizard — or once you have chosen to finish the wizard later. The guide adapts to your store: which items appear depends on your store's country, your plan, and the features you have switched on — so a US store collecting resale certificates sees different items than a German store collecting VAT numbers. The percentage is your completed items measured against the items that are relevant to your store, so items that don't apply to you never hold the number back. Completed items stay in the list with a check rather than disappearing, so you can always see what is already in place.
Go live (always visible)
These two items are the path to going live — together they mean a real buyer can find your form and be taken through to approval:
- Add registration link to storefront — Use Open menu editor to add your form link to your Shopify store navigation, then click Check installation to verify the link is reachable. Once verified the item auto-ticks. It also auto-ticks ("Verified by your first application") as soon as the first application arrives through the link, even if you never click Check installation.
- Submit and approve your first application — Open your proxy form, submit a test application, and approve it from the Applications page. Or use this step's Create sample application shortcut to generate a ready-to-review demo submission in one click. Auto-ticks after the first approval.
Finish setting up (always visible)
These three items appear for every store. They aren't part of going live, but they make the experience right for your applicants:
- Customize your approval email — Personalize the email customers receive when approved. Auto-ticks once you edit the approval template in Settings.
- Set your contact email — Add the address applicants should use to reach you about their application, in Settings → Notifications. Auto-ticks once an address is saved.
- Choose your form language — Set the default language your registration form falls back to when a buyer's own language isn't available. The item ticks once you confirm a language — in the onboarding wizard, in your form's Languages card, or with the one-click Keep English button on the item itself if English is what you want. English is already the fallback your form uses, so Keep English changes nothing about the form — it just records your choice.
One more item joins this section only when your store doesn't have Shopify B2B:
- Turn on Shopify B2B for your store — Without Shopify B2B, approved applicants become customers without a B2B company, so no company pricing, catalogs or payment terms. Shopify has two requirements: your store must be on the Basic, Grow, Advanced or Plus plan (B2B isn't available on Starter), and it must use the new customer accounts rather than legacy customer accounts (Shopify admin → Settings → Customer accounts). The item tells you which one is missing and links straight to the right Shopify settings page. After you change a setting, click Check again — once Shopify gives your store B2B access, the item disappears and a Level up item to turn on automatic B2B company creation takes its place. If both requirements are already met and B2B still isn't available, contact Shopify Support and ask them to enable B2B for your store.
When both Go live items are complete, the guide shows a You’re ready to go live! confirmation banner. The Level up section appears once the Go live and Finish setting up items are all complete. The card itself tucks away on your next visit once every item it is showing you — Go live, Finish setting up and any Level up items — is complete or snoozed; the visit where you finish it shows a short “You’re all set” confirmation instead. This works the same way on every plan.
Level up
These items surface once they are relevant to your store. Some are gated to Growth and Pro plans; others (upload your store logo, configure your business VAT, turn on automatic B2B company creation) appear on any plan when relevant. Items that don't apply to your store are never shown and never count against your percentage. On Growth and Pro stores the list includes setup rows for trade credit applications and for the personal guarantee:
- Upload your store logo (any plan; appears for every store until a logo is set) — Add your logo in Settings → Branding so applicants recognise your store on the registration form. The item stays visible and shows a check once a logo is uploaded.
- Add your business VAT for audit-ready verification (any plan; appears for EU/EEA/UK stores with VAT-collecting forms) — Configure your business VAT number in Settings → VAT Verification to enable consultation-number capture during buyer VAT checks. The item stays visible and shows a check once your business VAT is saved.
- Turn on automatic B2B company creation (any plan; appears once your store supports native Shopify B2B and you have finished the onboarding wizard) — Enable it in Settings → B2B Company so approved applicants become B2B Companies instantly. The item stays visible and shows a check once automatic company creation is on.
- Auto-match VAT-verified companies on approval (Growth/Pro) — Appears after 3 real approvals (approved samples don't count). Automatically selects the matching B2B Company for buyers with a validated EU VAT number when you approve, instead of prompting you to pick one. Auto-ticks when auto-match is enabled in B2B company settings.
- Connect Shopify Flow for custom workflows (Growth/Pro) — Navigate to automations settings to set up Flow triggers and actions. The item stays visible and shows a check the first time a Flow trigger fires for your shop.
- Set up resale certificate handling (US stores whose forms collect a document upload) — Choose how resale and exemption certificates are applied to approved buyers in Settings → B2B Company. Shows a check once a tax exemption has been applied to at least one application.
- Set up trade credit applications (Growth/Pro, or any store whose form already asks the credit question) — Choose when applicants fill in the credit application, how many trade references you want, your consent wording and the document threshold, in Settings → Automations. Shows a check once you have chosen any of these settings. The app records what applicants submit; credit decisions always stay with you.
- Publish your trade agreement (Growth/Pro) — Upload your wholesale terms in Settings → Agreement so applicants can review and accept them during onboarding. Shows a check once an agreement version is published.
- Publish your personal guarantee wording (Growth/Pro) — Upload the guarantee wording you want company owners to sign in Settings → Guarantee. Shows a check once a guarantee version is published. Publishing asks nobody to sign anything: you decide per company when to request a guarantee.
- Translate your lifecycle emails (Growth/Pro; appears once a form has at least one additional language enabled) — Turn on email localisation in Settings → Email Templates so approval and status emails match the language the buyer applied in. Shows a check once localisation is enabled with at least one active language.
- Put the deciding answers in your new-application alert (any plan; appears once you have received 5 applications — samples and quarantined spam don't count) — Add answers such as business type or order volume to the subject of your new-application alert using
{{fields.question}}, or list them all with{{fields.all}}, in Settings → Email Templates. Shows a check once the merchant alert template contains an answer variable. - Collect a separate billing address (any plan; appears once automatic B2B company creation is on and your form has an Address field) — Add a second Address field marked Used as: Billing address behind a checkbox so the approved company's location gets both addresses. Shows a check once any form has a billing address field.
- Brand your emails (any paid plan; shown after your first approval) — Add your logo, accent colour and company details to the emails applicants receive in Settings → Email branding, so approvals look like they come from you. Shows a check once you save your branding.
Setup Guide: upgrade suggestions and snoozing
Ways to go further
These are upgrade suggestions, not setup steps — completing one means changing plan, so they sit in their own section below the checklist, carry no check mark, and do not count toward your percentage. You can reach 100% on any plan while they are still on screen, and you can dismiss either of them for good with Not for my store: A suggestion disappears on its own once it no longer applies — if your plan already includes the feature, or you have already done the thing it suggests, you will never see it.
- Automate certificate review with AI verification — Appears once you have manually opened at least 3 uploaded certificates for review. AI verification (a Growth feature) reads the certificate, extracts the key fields, and flags mismatches so you no longer review each one by hand. Navigates to Pricing.
- Set up a wholesale trade agreement for distributors (Free/Starter) — Appears once you have received a couple of applications where the applicant selected a distributor or wholesaler business type. If your policy is to require signed wholesale terms before approving distributors, this takes you to Pricing, because trade agreements are a Growth and Pro feature. Nothing is applied automatically. Stores whose plan already includes trade agreements see the Publish your trade agreement Level up item instead, so the same request never appears twice.
Each item offers two deferral affordances: Not now (hides the item for 7 days) and Remind me next login (hides it for 24 hours). Optional items — your store logo, automatic B2B company creation, VAT company auto-matching, the new-application alert answers, the separate billing address and both Ways to go further suggestions — also offer Not for my store, a permanent “no thanks”: a declined Level up item is recorded as a decision you have made and counts as complete, while a declined upgrade suggestion is removed from the guide for good. You can also dismiss the entire card for the current session with the × button in the header — the guide will re-appear on the next page load unless every item it is showing you, Level up included, is complete or snoozed.
Registration URL Format
Your registration forms are available at these URLs on your storefront:
| URL | Description |
|---|---|
/apps/wholesale-register |
Default form |
/apps/wholesale-register/{form-id} |
Specific form by ID (for multiple forms) |
These URLs work automatically through Shopify's App Proxy — no theme code changes needed.
Navigating the App
B2B Onboard's main sections are accessible from the sidebar navigation, in this order: Applications, Action required, Forms, Companies, Reports, Settings and Pricing. Clicking the app name opens the Dashboard.
| Section | What It Does |
|---|---|
| Dashboard | Overview of key metrics, pending applications, and recent activity |
| Applications | Review, approve, reject, or request more info from applicants. Tabs filter by status; the Quarantine tab holds submissions the spam checks held back |
| Action required | Cross-company worklist of items that need attention — expired, expiring, or pending-review certificates, plus a spam-quarantine row when submissions are being held — sorted by urgency, each linking straight to where you act |
| Forms | Create and manage registration forms with the drag-and-drop builder |
| Companies | Onboarded B2B companies, with a detail page per company (contacts, locations, tax-exemption lifecycle card) |
| Reports | New applications per registration form for any date range (last week, last 30 days, month or year to date, or your own dates), compared with the period before (Growth and Pro) |
| Settings | Branding, customer tags, notification email, email templates, data export, test mode and Test runs |
| Pricing | Compare plans and change your subscription |
Your Forms
The Forms page lists all your registration forms. A default form is created when you install the app. You can customize it, duplicate it, or create new forms depending on your plan.
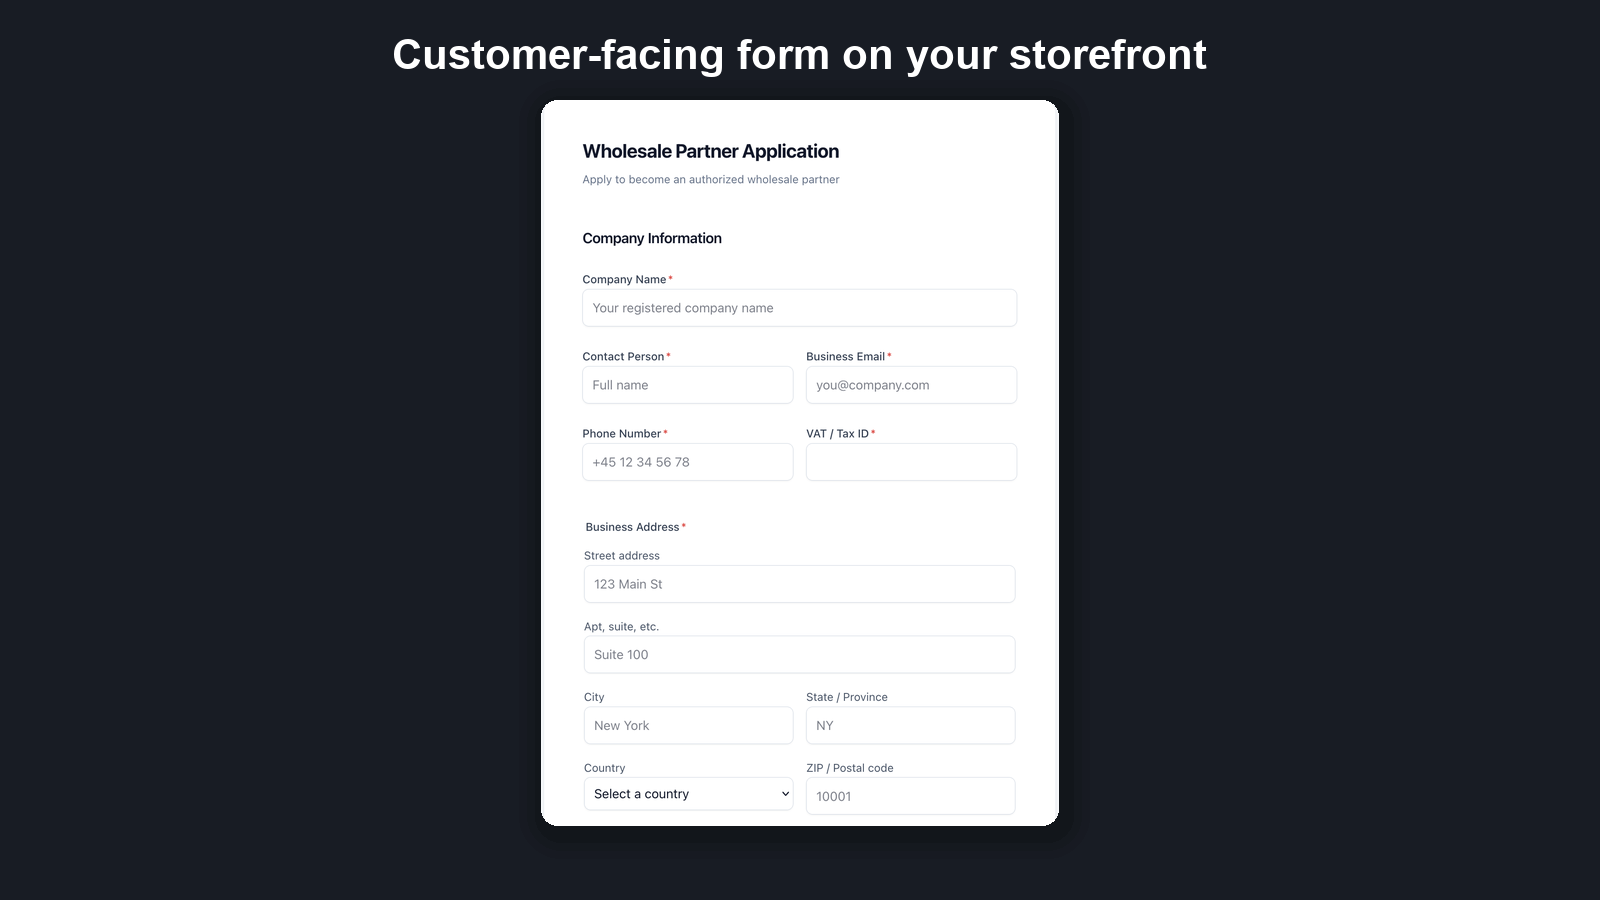
For a detailed walkthrough of the form builder, see the Form Builder Guide.
Next Steps
Now that you're set up, explore the detailed guides:
- Form Builder Guide — Customize fields, drag-and-drop reordering, templates, form settings
- Applications Guide — Review applications, approve/reject workflow, timeline
- Settings Guide — Branding, email templates, customer tags, data export
- Shopify Flow Guide — Automate workflows with Flow triggers and actions
Have questions? Check the FAQ or contact us at support@mentilead.com.