Applications Guide
Learn how to manage B2B customer applications — review, approve, reject, and request more information.
Application Lifecycle
When a customer submits a registration form on your storefront, an application is created with a pending status. From there, you review the submission and take one of three actions:
- Approve — creates a Shopify customer account and sends a welcome email
- Reject — declines the application and notifies the customer
- Request more information — asks the customer for additional details before deciding
The status flow is: pending → approved / rejected / info-requested. You can manually update the status at any time from the application detail page.
Buyer Status Page
You can give applicants a personal link to a read-only status page in their confirmation email. The buyer can open it at any time to see where their application stands — no account or login required. The page is per-application: the link arrives only in that applicant's "we received your application" email and is not a shared URL.
To include the link, add the {{statusUrl}} variable to your Application Received — Customer template under Settings → Email Templates (it appears in that template's Available variables list). New installs include it by default; if you customised this template earlier, add the variable yourself to switch the status page on.
The page shows a single, plain-language status and nothing else. It never exposes internal notes, reviewer names, raw form data, or other private fields. Statuses map as follows:
- Under review — the application has been received and is being reviewed (pending or in review).
- More information requested — you have asked the buyer for additional details; they should check their email.
- Approved — the wholesale account has been approved.
- Not approved — the application was declined.
The page is read-only — buyers cannot edit their submission, re-upload documents, or resend the link from it. Status links expire for security; once expired, the page shows a neutral "this link has expired" message directing the buyer to their latest email or to contact the store.
Viewing Applications
The applications list shows all submissions across your forms. Each row displays the customer name, email address, associated form name, submission date, and a colour-coded status badge.

Before your first application arrives, this page shows a 'No applications yet' panel. Its primary action, Create sample application, generates a one-click demo submission so you can try the full review-and-approve flow immediately — no need to wait for a real buyer (see Sample applications below). The panel also lets you copy your registration link, preview the form as a customer, and open Shopify's navigation editor to add the link to your store menu.
Sample applications
A sample application is a one-click demo submission that lets you experience reviewing and approving a wholesale application before any real customer applies. Create one from the empty Applications panel, from the Submit and approve your first application item in your setup guide, or from the final screen of the onboarding wizard.
The sample is tailored to your store's country: an EU/UK store reviews a buyer with a verified VAT number, an Australian store sees a verified ABN, a New Zealand store a verified NZBN, and a US store opens a buyer with an attached, verified resale certificate you can preview and download — all shown through the same verification badges as real applications.
Sample applications are clearly labelled with a Sample badge on the list and detail pages, and the detail page carries a banner reminding you it is demo data. They are safe to remove: the detail page has a Delete sample action (the only application delete path — real applications are never deleted). Samples never send an email to the sample buyer, never trigger Shopify Flow, and never count toward your monthly plan usage. The one email that does send is your own merchant notification, so you can confirm your alerts are working.
Filtering and Searching
Use the status filter tabs at the top of the list to narrow down applications:
- All — every application regardless of status
- Pending — applications awaiting your review
- Approved — applications you have approved
- Rejected — applications you have declined
- Info Requested — applications where you have asked for more details
You can also search by customer name or email address using the search field to quickly find a specific application.
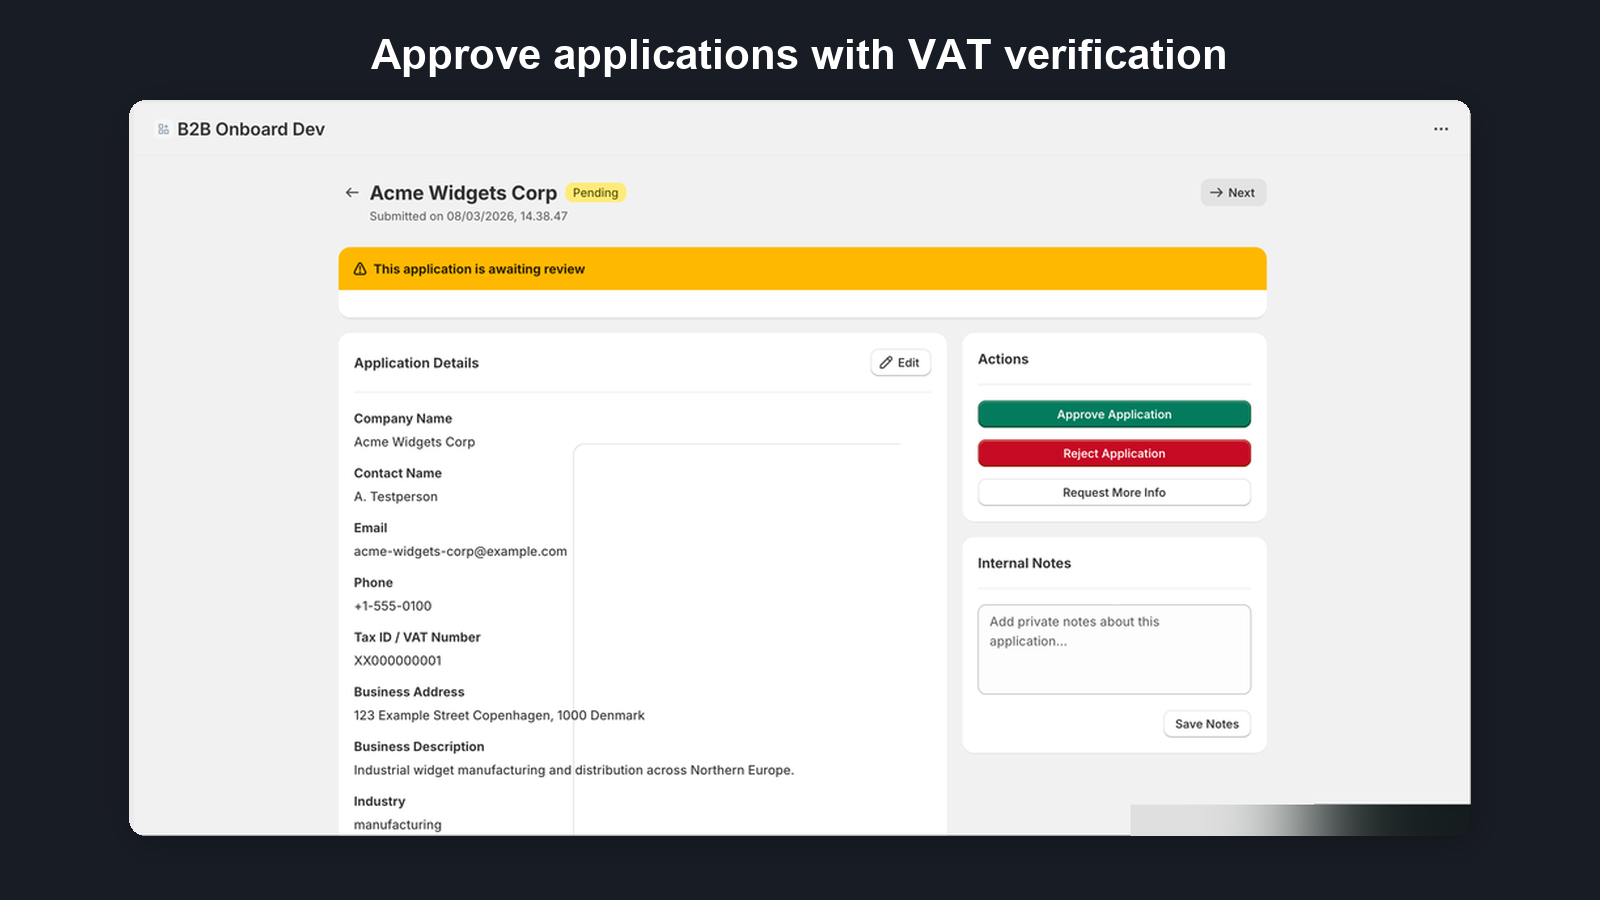
Application Detail
Click any application to open its detail view. Here you will find the full submission data including all form fields, any uploaded files, and the complete action timeline showing every status change and note.
Approve
Approving an application triggers three actions:
- Creates a Shopify customer account using the submitted contact information (name, email, phone, and address fields). Phone numbers are automatically normalized to international format (E.164) before they reach Shopify. If the phone number is already assigned to another Shopify customer, you can still approve — a confirmation appears, and the phone number is omitted from the new customer account.
- Applies customer tags from your Approved tags list (Settings → Customer Tags) plus any per-option tags attached to the applicant's selected form field options, so you can identify B2B customers in Shopify admin and set up automatic discount rules
- Sends an approval email notifying the customer that their application has been accepted
Reject
Rejecting an application sends a rejection email notification to the customer. The application remains in the system for your records — it is not deleted. You can still view the full submission and timeline at any time. (The only exception is a sample application, which you create yourself for testing and can remove with its Delete sample action.)
Request More Information
If you need additional details before making a decision, you can request more information from the customer:
- Click Request Info on the application detail page
- Write a custom message explaining what additional information or documents you need
- The application status changes to info-requested and the customer receives an email with your message
- After receiving the customer's response through other channels (email, phone, etc.), you can manually update the application status to continue the review
Note: Customer responses are received through your regular communication channels (email, phone). The application timeline can be updated manually to reflect the response.
Customer Tags
When you approve an application, B2B Onboard applies tags from two sources: the Approved tags list configured in Settings → Customer Tags, and any per-option tags attached to options the applicant selected on select or multi-select form fields. Both are merged additively — existing tags on a returning customer are preserved and never removed.
Tags are useful for:
- Identifying B2B customers in Shopify admin — filter your customer list by tag to see all wholesale accounts
- Automatic discount rules — create Shopify discounts that apply only to customers with specific tags
- Segmentation — use tags to build customer segments for targeted marketing or reporting
Bulk Actions
Select multiple applications using checkboxes on the Applications page to approve or reject them all in one action.
Bulk actions respect Shopify API rate limits and process sequentially. Each application in a bulk action gets its own timeline entry, email notification, and customer account (if approved).
VAT/Tax ID Verification
When a form includes a Tax ID field, submitted VAT numbers are verified automatically:
- EU VAT numbers are checked against the VIES database
Verification status appears as a badge on the application detail page: Verified, Invalid, or Pending.
You can re-verify a VAT number at any time from the application detail page. When an application with a verified VAT is approved, the customer can be automatically marked as tax-exempt in Shopify.
The full verification evidence — status, the verified company name and address, the verification source, and the VIES consultation number (a timestamped proof token issued by VIES) — is recorded on each application and included in the applications CSV export. This gives you the documentation needed to defend a reverse-charge claim under EU VAT rules.
Certificate Review
When an applicant uploads a resale or tax-exemption certificate, B2B Onboard reads the document and flags anything that doesn't match the application — the legal business name, issuing state, tax ID, or expiry date — so you can review faster and approve with more confidence. It is decision-support: the app flags mismatches and you make the final decision. A flag means "take a closer look," not "deny," and it does not block approval.
Each certificate carries one of five statuses — collected, verifying, verified, flagged, or needs review. Certificate review is available on the Growth and Pro plans.
On Pro, existing customers can also renew certificates themselves through a secure self-service link, with automatic expiry reminders — each renewal reviewed the same way. See the Certificates Guide.
For the full walkthrough — what each status means, reading confidence, approving a flagged application, your responsibilities, and how documents are processed — see the Certificates Guide.
Business Verification (KYB)
From a company's detail page you can run a business-registry check (KYB — know your business) against the official company register for the company's jurisdiction. Enter the registration number, pick the jurisdiction, and B2B Onboard looks the company up, compares the registry's official name, registered address, and lifecycle status against the details you hold, and surfaces anything that doesn't line up.
It is decision-support, exactly like certificate review: the check flags discrepancies for you to review — it never approves or rejects a company for you, and it never blocks anything. A human (you) always makes the call.
Covered registries:
- United Kingdom — Companies House (the free public company register)
- Denmark — CVR (Det Centrale Virksomhedsregister, the open Danish business register)
The result carries one of these advisory statuses: Verified (the registry confirmed the company and nothing was flagged), Flagged (a name/address mismatch, an inactive registry status, or a duplicate VAT/email/address elsewhere in your shop needs a look), Pending (the check hasn't completed yet), Not found (the registry has no company for that number — check the number and jurisdiction), or Unavailable (the registry couldn't be reached or isn't configured — verify manually and re-check). A plain-language match confidence band (High / Medium / Low) summarises how closely the registry record matched — never a raw percentage.
A free/consumer contact-email domain is surfaced as an informational signal on the KYB card for context; on its own it does not change a Verified result to Flagged or add a worklist row.
Flagged and Unavailable companies appear on the Action required worklist as a "KYB review" row, so nothing slips through. You can re-run the check at any time from the company's KYB card.
B2B Company Creation
On stores with native B2B enabled, approving an application creates or matches a B2B Company in Shopify depending on your matching configuration. The Company includes:
- A contact from the applicant's details
- A location from address fields
- The tax ID from the form submission
If you have configured a B2B catalog in Settings, it is automatically assigned to the new Company. If catalog assignment fails (for example, the catalog no longer exists, or your plan's catalog limit has been reached), the approval still completes and a "Catalog not assigned" warning appears in the success message — the Company is created and you can assign the catalog manually in Shopify.
If company creation fails: Company creation works best with a valid phone number in international format (e.g. +1 555 123 4567) and a recognised country on the address field. If the phone or address data can't be used — or company creation otherwise fails — the customer is still approved and can transact immediately. The company-creation failure is recorded with its reason, a "B2B company not created" warning appears in the success message, and you can fix the data and retry company creation from the application detail page. A "companies need attention" nudge on the Dashboard also surfaces approved applications whose company creation failed so none are missed.
This feature is detected automatically — no setup needed. If your store has native B2B access, Companies are created on approval.
B2B Company Matching
When company matching is enabled in Settings, the application detail page shows a B2B Company Matching card in the right sidebar for pending applications. The card evaluates three independent signals to determine whether the applicant may belong to an existing B2B Company:
- VAT / Tax ID — high-confidence signal. Matches the applicant's VAT number against existing company contacts' notes.
- Email domain — medium-confidence signal. Compares the applicant's email domain against contacts in existing companies. Freemail providers (Gmail, Yahoo, etc.) are excluded automatically.
- Company name — low-confidence signal. Exact case-insensitive match against existing company names.
The matching card displays one of three states:
- Existing company found (amber) — a high-confidence match was detected. Shows the company name, contact count, and which signals matched. You can choose Add to company to assign the applicant as a contact on the existing company, or Create new to create a separate company as usual.
- Possible match — verify manually (red) — a low or medium-confidence match was found. The same options are available, but Create new is visually emphasised as the safer default.
- No matching company found (blue) — no signals matched. A new B2B Company will be created on approval.
If you click Approve Application without selecting an option on the matching card, a prompt appears asking you to choose before proceeding.
When VAT auto-match is enabled in Settings and a high-confidence VAT match exists, the applicant is automatically assigned to the existing company on approval without prompting. The matching card still appears on the review page for transparency.
Timeline and Audit Trail
Every action taken on an application is logged with a timestamp and the actor who performed it. The timeline on the application detail page shows the full history, including:
- Submission — when the customer originally submitted the form
- Status changes — approvals, rejections, and information requests with who made the decision
- Notes — any messages sent to the customer when requesting more information
- Customer responses — when the customer replied to an information request and what they provided
This audit trail gives you a complete record of every interaction, which is helpful for compliance and team handoffs.