Applications Guide
Learn how to manage B2B customer applications — review, approve, reject, and request more information.
Application Lifecycle
When a customer submits a registration form on your storefront, an application is created with a pending status. (If your plan's monthly application limit has been reached, it is saved as held instead and becomes pending automatically when capacity opens up — see Held Applications and Plan Limits.) From there, you review the submission and take one of three actions:
- Approve — creates a Shopify customer account and sends a welcome email
- Reject — declines the application and notifies the customer
- Request more information — asks the customer for additional details before deciding
The status flow is: pending → approved / rejected / info-requested. You can manually update the status at any time from the application detail page. A rejected application can be reopened, and an info-requested application returns to pending when the applicant updates it through the link in your email.
Buyer Status Page
You can give applicants a personal link to a read-only status page in their confirmation email. The buyer can open it at any time to see where their application stands — no account or login required. The page is per-application: the link arrives only in that applicant's "we received your application" email and is not a shared URL.
To include the link, add the {{statusUrl}} variable to your Application Received — Customer template under Settings → Email Templates (it appears in that template's Available variables list). New installs include it by default; if you customised this template earlier, add the variable yourself to switch the status page on.
The page shows a single, plain-language status and nothing else. It never exposes internal notes, reviewer names, raw form data, or other private fields. Statuses map as follows:
- Under review — the application has been received and is being reviewed (pending or in review).
- More information requested — you have asked the buyer for additional details; they should check their email, which has a link to update their application.
- Approved — the wholesale account has been approved.
- Not approved — the application was declined.
The page is read-only — buyers cannot edit their submission, re-upload documents, or resend the link from it. Status links expire for security; once expired, the page shows a neutral "this link has expired" message directing the buyer to their latest email or to contact the store.
Viewing Applications
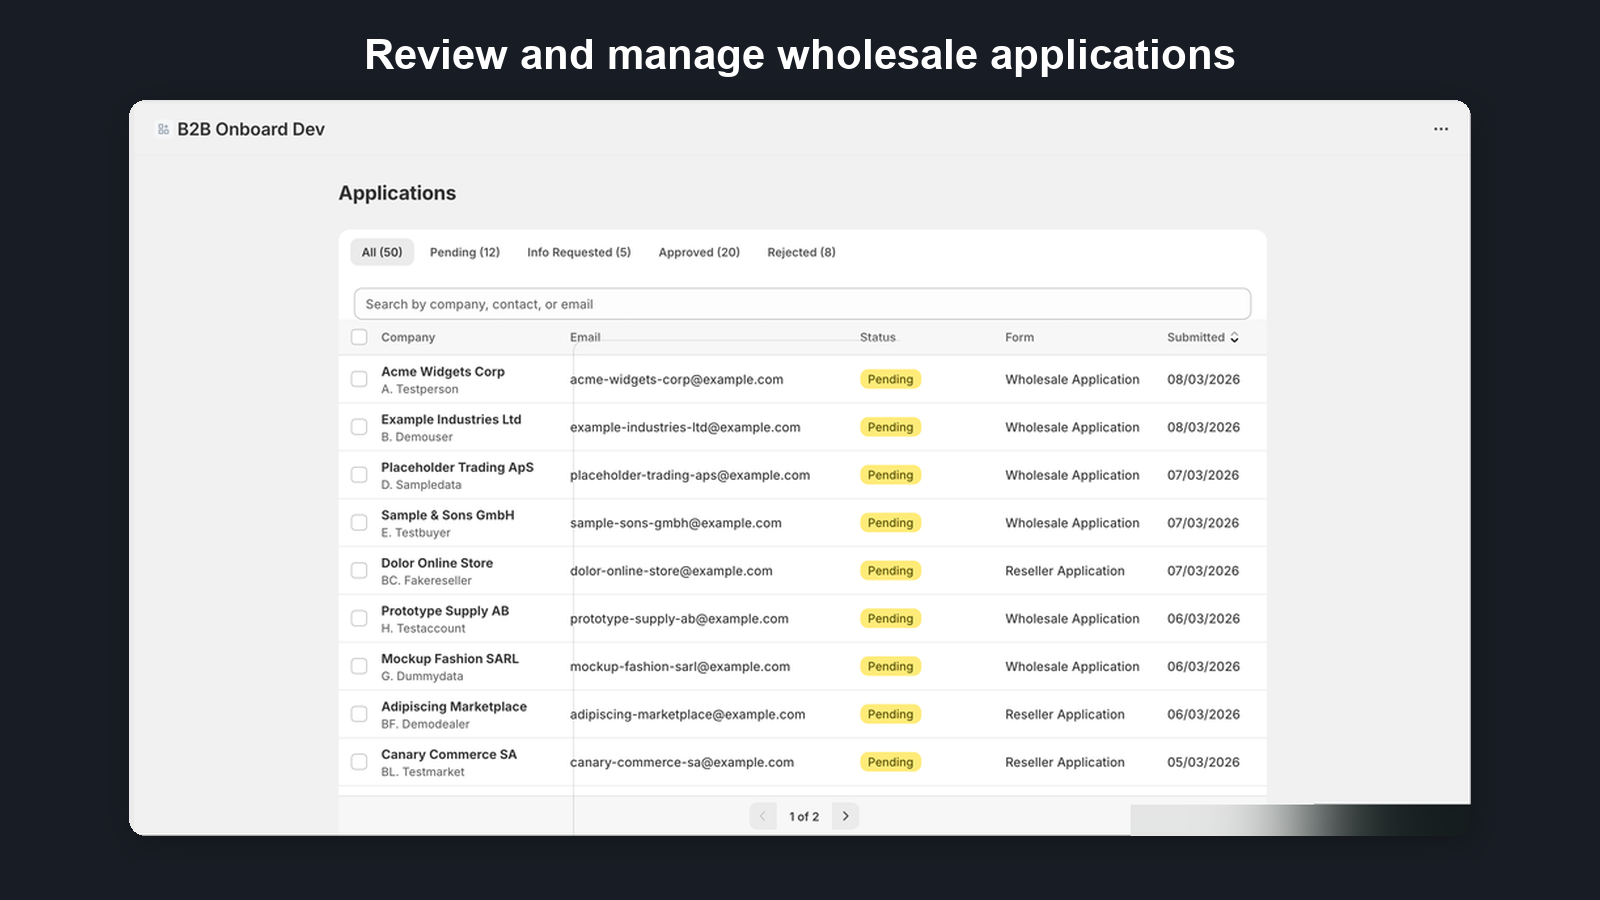
The applications list shows all submissions across your forms, except submissions held in Quarantine (they have their own tab). Each row displays the customer name, email address, associated form name, submission date, and a colour-coded status badge.
Before your first application arrives, this page shows a 'No applications yet' panel. Its primary action, Create sample application, generates a one-click demo submission so you can try the full review-and-approve flow immediately — no need to wait for a real buyer (see Sample applications below). The panel also lets you copy your registration link, preview the form as a customer, and open Shopify's navigation editor to add the link to your store menu.
Sample applications
A sample application is a one-click demo submission that lets you experience reviewing and approving a wholesale application before any real customer applies. Create one from the empty Applications panel, from the Submit and approve your first application item in your setup guide, or from the final screen of the onboarding wizard.
The sample is tailored to your store's country: an EU/UK store reviews a buyer with a verified VAT number, an Australian store sees a verified ABN, a New Zealand store a verified NZBN, and a US store opens a buyer with an attached, verified resale certificate you can preview and download — all shown through the same verification badges as real applications.
Sample applications are clearly labelled with a Sample badge on the list and detail pages, and the detail page carries a banner reminding you it is demo data. They are safe to remove: the detail page has a Delete sample action (the only application delete path — real applications are never deleted). Samples never send an email to the sample buyer, never trigger Shopify Flow, and never count toward your monthly plan usage. The one email that does send is your own merchant notification, so you can confirm your alerts are working.
Filtering and Searching
Use the tabs at the top of the Applications page to narrow down applications. They always appear in this order: All, Pending, Quarantine, Approved, Rejected, Info requested, Held, Imported. Each tab shows its count, and on a narrow screen the last tabs fold into a More views menu.
- All — every application regardless of status, except submissions held in Quarantine (those have their own tab)
- Pending — applications awaiting your review
- Quarantine — submissions the spam checks held back (see Quarantine below)
- Approved — the wholesale account has been approved.
- Rejected — applications you have declined
- Info requested — applications where you have asked for more details
- Held — applications that arrived after your monthly plan limit was reached (see Held Applications and Plan Limits)
- Imported — applications created by a company CSV import rather than submitted by a buyer (see the migration guide)
Imported applications are marked with an Imported badge on the list — and their companies carry the same badge on the Companies page — so a migrated back-catalogue is always distinguishable from organic sign-ups. They are excluded from your dashboard performance metrics and weekly digest, so an import never inflates your approval rate, response time, or time-saved numbers.
If you delete a company in your Shopify admin, opening its record here tells you so: a banner explains the company was deleted in Shopify, so contacts, locations and roles can no longer be shown, while the record itself is kept for its application and credit history. From then on it carries a Missing badge on the Companies page instead of Active. We check when you open the record rather than polling Shopify, so a company you deleted still shows its old badge until someone opens it.
You can also search by customer name or email address using the search field to quickly find a specific application.
Held Applications and Plan Limits
Each plan includes a monthly application allowance (Free 10, Starter 50, Growth 100, Pro unlimited). Reaching your limit never turns an applicant away: your registration form keeps working exactly as before, the applicant submits normally and receives the usual confirmation, and nothing in their experience mentions your plan.
Applications that arrive past the limit are saved in full with a Held status. You can open a held application and read everything — contact details, addresses, tax IDs, uploaded documents — the data is yours. What waits until you have capacity is processing: Approve, Reject, and Request More Info are disabled, auto-approval rules don't run, and no customer or B2B company is created yet.
Held applications are released automatically, oldest first, in two situations:
- A new month starts — released into the fresh allowance until the limit is reached again. Nothing is ever deleted or lost.
- You upgrade — released immediately, up to the new plan's allowance (a Pro upgrade releases everything).
So you always know where you stand, B2B Onboard shows a usage banner on every page from 80% of your allowance, a used/limit meter on the Applications page, and sends you at most two emails per month: one as you approach the limit and one when the first application is held.
Quarantine (spam holds)
Public registration forms attract junk. When the spam checks judge a submission suspicious, it is held back on the Quarantine tab of the Applications page instead of landing in your other Applications tabs. Click the Quarantine tab (its label shows how many are held) to review them. Whoever submitted it sees the same confirmation page as everyone else, so a spammer gets no feedback about what was filtered.
A quarantined submission is inert. It is not counted in your Applications list or your monthly plan usage, it sends no notification email to you and no confirmation email to the submitter, and it cannot be approved, rejected, or actioned by an automation while it sits there. Nothing is deleted behind your back — the full submission is stored, and restored intact if you mark it as not spam.
The Quarantine tab lists who submitted it: the company name, the contact name and email address, when it arrived, and badges naming the checks that flagged it, so you can judge at a glance. Two actions are available:
- Not spam — restores the submission to your Applications list as pending, and runs everything a normal submission would have run: your notification email, the applicant's confirmation, auto-approval rules, and any connected Shopify Flow. It then counts toward your monthly allowance like any other application.
- Delete — select the rows you are sure about (up to 10 at a time) and delete them permanently, after a confirmation step. Deleting removes the submission and its history for good. When you delete submissions you can also tick Also block these senders; restoring a submission never unblocks a sender.
Click any held submission to review it in place. A panel opens showing everything that was submitted, answer by answer, alongside a plain-language explanation of each check that fired — and where a link was the reason, the answer that contained it is marked. Not spam and Delete are both available from the panel, so you can decide without leaving the tab.
The badges name the checks that flagged the submission, and the set of checks grows over time. One you will see is link_spam: a web address was pasted in among other words in a free-text answer, such as a notes or "tell us about your business" field. That is a common shape for junk, but a genuine applicant occasionally includes their own website, so these submissions are held for your review rather than turned away. An answer that is only a web address, with nothing else in the box, is not flagged at all — that is someone answering a "your website" question, whichever free-text box your form gave them for it. And when a held answer links to the same domain as the applicant's own email address, the review panel marks it with an Applicant's own domain badge, so you can see at a glance that they linked their own site rather than someone else's.
Other badges describe where the submission came from rather than what it said. Your form hands out a single-use pass each time its page is loaded on your storefront, and a submission spends that pass when it arrives. A submission that carries no pass — typically a script posting straight at the address your form uses, without ever loading the page — is held with a form_token_missing badge. One that reuses a pass already spent, which usually means a page was sent twice after pressing the browser's Back button, is held with form_token_replayed. A pass also goes stale if a form is left open for more than a day before being sent. In every one of those cases the submission is held for your review, never discarded, and Not spam restores it exactly as it does any other hold.
Volume is watched too. When submissions arrive unusually fast from the same network, or unusually many turn up in a single day for one store or from one email domain, the ones over the line are held for review the same way, with a badge starting rate_limit naming which limit was crossed. The email-domain limit counts business domains only — addresses at free providers such as Gmail, Outlook or Yahoo are not counted, because unrelated customers share them — and the per-store and email-domain limits are counted for your store alone, so another merchant's registrations can never use up your allowance. The limits sit far above what a normal week of genuine registrations looks like, so this generally only shows up during a burst — and as with every other hold, nothing is turned away or deleted: Not spam restores the submission intact.
You don't have to remember to check the tab. While anything sits in Quarantine, your Dashboard shows a "Quarantined submissions" row on the Action Required card, the Action required page lists a "Spam quarantine" row showing how long until the oldest hold is removed, and your weekly digest email includes the count — a week where quarantine holds are the only news still sends the digest. Each of them takes you straight to the Quarantine tab.
Separately, the form runs a couple of invisible checks aimed at automated scripts — an unused field a person never sees, and a submission that arrives faster than anyone could type. The hidden field is fully hidden from browsers, so autofill should no longer reach it; if it does and its content looks like autofill (it repeats one of the applicant's own answers), the application goes straight to your Applications list and is not treated as spam. A submission that trips only one of the checks otherwise is held in Quarantine with a honeypot badge ("Hidden anti-spam field was filled" in the review panel) or a time_trap badge ("Submitted unusually fast"), not discarded, so a lone hit is stored for your review, Not spam restores it, and like every hold it is removed automatically after 30 days if you leave it. Only when the evidence corroborates — both checks trip together, or one trips on a submission that also carries a missing or invalid single-use pass — is the submission discarded on the spot: it is not stored, does not appear in Quarantine or the Applications list, does not count toward your plan usage, and sends no email. Whoever submitted still sees the ordinary confirmation page, so a bot gets no clue that it was filtered. When CAPTCHA protection is enabled on the form, a low Google reCAPTCHA score — Google judging the visit as likely automated — is another signal that holds a submission in Quarantine rather than rejecting it, with a recaptcha_low_score badge ("Low reCAPTCHA score" in the review panel). Privacy browsers, VPNs and ad blockers can lower a genuine applicant's score, so check these and restore the real ones. A submission from an address or domain on your blocked applicants list is held with a blocklist badge ("Blocked sender" in the review panel). No check like this is perfect, and none of them replaces reading the applications you receive.
While anything is waiting, a banner at the top of your Dashboard and Applications pages, and of each application’s own page, shows how many submissions are held and when the oldest will be deleted, with a Review quarantine button that opens the Quarantine tab. The banner stays until Quarantine is empty. If you don't open the app, the address set as your notification email also gets one reminder email 7 days before held submissions are deleted.
Anything you leave in Quarantine is removed automatically after 30 days, so filtered junk does not pile up. Review the tab occasionally — the checks are deliberately cautious, but a real customer can still be flagged, and "Not spam" puts them straight back into your normal workflow.
Application Detail
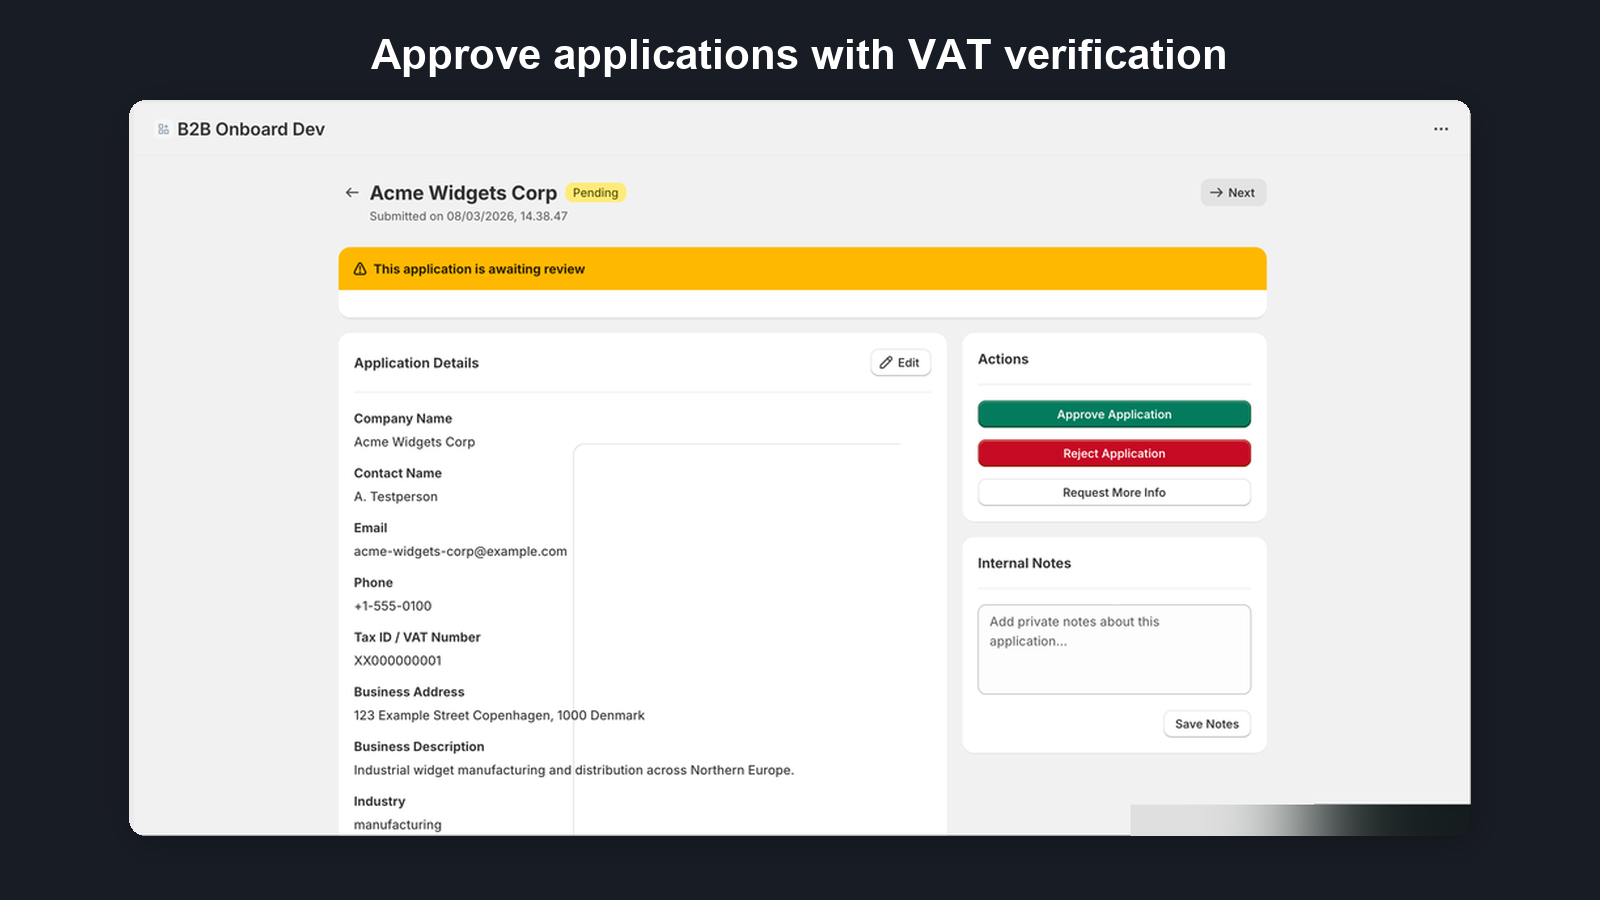
Click any application to open its detail view. Here you will find the full submission data including all form fields, any uploaded files, and the complete action timeline showing every status change and note.
Notes: the Internal Notes card has one editable Staff note for your team (private: buyers never see it). Below it, the From Shopify Flow list shows notes added by the Add internal note action in your Flow workflows, newest first, each labelled “via Shopify Flow · <author label>” with the time it was added. Flow notes are plain text (links are not clickable), are kept, and never replace the staff note. A note added with a Note key replaces the earlier Flow note with the same key on this page: only the latest version is shown, marked “Latest version · replaces N earlier”, and every version stays in the timeline. A note longer than 10,000 characters is shortened and shows a “Shortened” badge. See Adding Internal Notes from Flow.
Approve
Approving an application triggers three actions:
- Creates a Shopify customer account using the submitted contact information (name, email, phone, and address fields). Phone numbers are automatically normalized to international format (E.164) before they reach Shopify. If the phone number is already assigned to another Shopify customer, or Shopify will not accept the format it was submitted in, you can still approve — a confirmation appears, and the phone number is omitted from the new customer account. Applications waiting on a phone number Shopify will not accept also show up under Action required, so a lead never goes quiet while you track down the right number.
- Applies customer tags from your Approved tags list (Settings → Customer Tags) plus any per-option tags attached to the applicant's selected form field options, so you can identify B2B customers in Shopify admin and set up automatic discount rules
- Sends an approval email notifying the customer that their application has been accepted
Where you approve: clicking Approve Application opens a dedicated Approve page rather than a tall dialog. It has two columns: every decision on the left — anything that needs your attention first, then the company (create a new one or add the buyer to an existing one), the buyer setup, customer tags, and the metafields (both the ones you set by hand and the ones your form's answers fill in) — and on the right a live What will happen summary, the applicant's details, and the Approve and Cancel buttons. The back arrow at the top returns you to the application without approving, and nothing is written to Shopify until you press Approve.
Approval also writes the applicant's answers into Shopify metafields. If one of those answers is not something Shopify will accept for the field it maps to, the Approve page blocks the approval with a warning titled 1 metafield can't be written (3 metafields can't be written for several), naming the question and the reason. Either use Edit application to correct the answer, or tick I understand — approve without this metafield to approve past it — everything else is created exactly as normal, and the timeline records which keys were skipped. See metafield bindings for the full detail, including the Retry metafield writes action for a value Shopify only rejects at write time.
Credit decision. When the applicant submitted a credit application before approval, the Approve page shows it in a Credit application card under the buyer setup. Choose Decide later on the company page (the default) or Approve credit now and enter the approved credit limit — it is recorded on the company in the same step. Payment terms come from the buyer setup; an existing company keeps its own terms. Approving credit while adding the applicant to an existing company replaces the limit already approved for that company; its payment terms are kept. Declining credit is done on the company page after approval. See the credit applications guide.
Business details saved on the Shopify customer
Alongside your own bindings, approval always saves a small fixed set of business details onto the new Shopify customer, in the b2b_onboard namespace. They are picked up from matching questions on the form — a text, long-text, dropdown or tax-ID question whose label contains the word in brackets:
- Tax ID (
b2b_onboard.tax_id) — from a question labelled with “tax”; holds the tax answer whenever the form asks for a tax ID, whatever kind of number it is - VAT number (
b2b_onboard.vat_number) — from a question labelled with “vat”, unless the answer is known not to be a VAT number (see below) - Business type (
b2b_onboard.business_type) — from a question labelled with “business type” - Website (
b2b_onboard.website) — from a question labelled with “website” - Annual revenue (
b2b_onboard.annual_revenue) — from a question labelled with “revenue”
The website answer is stored as a web address, so an answer of www.example.com is saved as https://www.example.com — the missing https:// is added for you rather than the whole approval failing on it. An answer that cannot be turned into a web address at all (say “ask us”) is flagged before approval with the same metafields can't be written warning as a bound metafield, so you can fix it or approve without it. Questions with no answer are left off rather than written blank.
The VAT number holds the buyer’s tax answer unless we know it is not a VAT number: a buyer in the US, Canada, Australia or New Zealand, an Australian ABN, a New Zealand NZBN or a Canadian business number, or a Norwegian organisation that is not VAT-registered. In those cases only the tax ID holds the answer, so invoicing apps don't print it as a “VAT number”. This applies to new approvals only: customers approved earlier keep the VAT number they already have.
Reject
Rejecting an application sends a rejection email notification to the customer. The application remains in the system for your records — it is not deleted. You can still view the full submission and timeline at any time. (The only exception is a sample application, which you create yourself for testing and can remove with its Delete sample action.)
Changed your mind, or rejected by mistake? Open the application and choose Reopen application. It goes back to pending so you can review it again; the original rejection and its reason stay in the timeline. Reopening sends no email to the applicant and does not count against your monthly application limit again.
Rejecting never blocks anyone on its own. Tick Block this email address from applying again on the Reject dialog if you never want to hear from that address again — future submissions from it are held in Quarantine (see Quarantine) and you can unblock it under Settings → Blocked applicants.
Request More Information
If you need additional details before making a decision, you can request more information from the customer:
- Click Request Info on the application detail page
- Write a custom message explaining what additional information or documents you need
- The application status changes to info-requested and the customer receives an email with your message and a secure link (valid for 14 days) that opens their own application with their answers already filled in
- The applicant changes what you asked for — including replacing a document — and submits. The application returns to pending, shows a Revised badge and appears in Action required as “Applicant updated”. The timeline lists each changed answer (old → new), and you receive an Application Updated — Merchant email
Note: The link stops working once the applicant has submitted their update or once you approve or reject the application. Requesting information again sends a new link. If you customised the More Information Requested email before this link existed, add {{reviseUrl}} to it (for example on its own line after {{requestedInfo}}) — a one-time banner on Settings → Email Templates reminds you. Without it the email is sent without the link and the applicant replies through your usual channels.
Customer Tags
When you approve an application, B2B Onboard applies tags from two sources: the Approved tags list configured in Settings → Customer Tags, and any per-option tags attached to options the applicant selected on select or multi-select form fields. Both are merged additively — existing tags on a returning customer are preserved and never removed.
You can also add your own tags while reviewing. The Customer tags card on the Approve page shows the preset tags (from Settings and your form rules) locked in place, and lets you type extra ones — a customer tier, a sales region, anything you segment by — with autocomplete from the tags already in use on your Shopify customers. Press Enter to add a tag you have not used before. Your manual tags are applied to the Shopify customer together with the presets, and the application timeline records Tags added by reviewer with the tags you chose.
Metafields. The Metafields card on the Approve page lets you fill in Shopify metafields by hand — ERP customer numbers, account managers, internal codes and anything else that is not a question on your form. The rows you see every time are the ones configured under Settings → B2B Company Creation → Reviewer fields, grouped by the record they are written to (Customer, Company, Company location). Use Add another metafield to pick any other definition for this one approval. A field that is also mapped from a form question arrives pre-filled with the applicant's answer and is labelled From the form answer; change it and the label becomes From the form, changed by you, with a Reset to form answer link to put it back. Your value is written instead of the answer — the application itself keeps the answer exactly as it was submitted. A value Shopify would refuse (letters in a whole-number field, a value outside the definition's choices) blocks the approval and names the field, before anything is written. After approval the application shows a Set by you on approval list of what you typed, and the timeline records Metafields set by reviewer. The metafields your form's own questions write are part of the same card: they sit at the bottom under From the form, folded away behind Show details, and a field you overrode above is listed once — with your value — not twice. Reviewer fields that carry a default in Settings are also applied by bulk, automatic and Flow approvals; fields without a default are skipped there, because nobody is at the keyboard to fill them in. While you are still on the Approve page, everything you set — the company choice, location roles, buyer setup (contact role, payment terms, checkout mode, catalog or market), the certificate and credit decisions, tags, metafield values and rows you added — is kept in your browser tab, so reloading the page, looking something up in Shopify or going back to fix the application and coming back does not lose it. If an approval is refused, use Edit application on the message (or the back arrow) to fix the application; your choices are still there when you return. Only the “approve anyway” confirmations are cleared, so you confirm them again. Leaving with Cancel before any refusal, or approving, clears the saved choices.
Tags are useful for:
- Identifying B2B customers in Shopify admin — filter your customer list by tag to see all wholesale accounts
- Automatic discount rules — create Shopify discounts that apply only to customers with specific tags
- Segmentation — use tags to build customer segments for targeted marketing or reporting
Bulk Actions
Select multiple applications using checkboxes on the Applications page to approve or reject them all in one action.
Bulk actions respect Shopify API rate limits and process sequentially. Each application in a bulk action gets its own timeline entry, email notification, and customer account (if approved).
VAT/Tax ID Verification
When a form includes a Tax ID field, several kinds of number are verified automatically against their official register:
- EU VAT numbers are checked against the VIES database
- UK VAT numbers are checked against HMRC's VAT lookup
- Australian ABNs are checked against the Australian Business Register (ABR)
- New Zealand NZBNs are checked against the NZBN register
- Norwegian organisation numbers are checked against Brønnøysundregistrene, which also reports MVA (VAT) registration status. A bare 9-digit organisation number is recognised automatically even when the tax ID question is left on automatic country detection: the applicant's own address country decides when they gave one (a Norwegian address routes it to the register), and your store's country is used only as a fallback when no address country was submitted. The full
NO…MVAform is recognised everywhere. - Numbers from other countries are accepted and stored, but not auto-verified — Canadian GST/HST numbers, for example, are format-checked only (see below)
For a Norwegian application, the detail page shows an Org.nr Verification (Norway) card with the registry's official name and registered address, the organisation form (AS, ASA, ENK, NUF and so on), and whether the company appears in the MVA register. Not being in the MVA register is normal for new or small Norwegian businesses, so it is shown as plain context rather than a warning.
Verification status appears as a badge on the application detail page: Verified, Invalid, or Pending.
You can re-verify a tax ID at any time from the application detail page — this applies to VAT numbers, ABNs, NZBNs and Norwegian organisation numbers alike. When an application with a verified VAT is approved, the customer can be automatically marked as tax-exempt in Shopify.
The full verification evidence — status, the verified company name and address, the verification source, and the VIES consultation number (a timestamped proof token issued by VIES) — is recorded on each application and included in the applications CSV export. This gives you the documentation needed to defend a reverse-charge claim under EU VAT rules.
Canadian GST/HST numbers
B2B Onboard does not verify Canadian GST/HST numbers — the Canada Revenue Agency (CRA) publishes no public lookup service an app can call. Instead, a Canadian application's detail page shows a GST/HST Registry check: a one-click link to the official CRA registry with the nine-digit Business Number ready to copy, so the lookup takes seconds.
The CRA tool asks for three things: the nine-digit Business Number, the business name in the exact form it was registered (slight variations will not match), and a transaction date. Once you have looked it up, record what the registry showed — Registered, Not registered, or Not found. Your answer is stored on the application with a timestamp and appears in the timeline, so the evidence behind your decision stays on file.
This is identity decision-support only: it records what you saw, and it does not change tax treatment or grant any exemption. For buyers whose address is in Quebec, the card also notes that QST registration is a separate provincial registration with its own number format (ten digits followed by TQ and four digits — it is not the GST/HST number, and the application form does not collect it); if the buyer provides their QST number, it is looked up at Revenu Québec, not at the CRA.
Certificate Review
When an applicant uploads a resale or tax-exemption certificate, B2B Onboard reads the document and flags anything that doesn't match the application — the legal business name, issuing state, tax ID, or expiry date — so you can review faster and approve with more confidence. It is decision-support: the app flags mismatches and you make the final decision. A flag means "take a closer look," not "deny," and it does not block approval.
How names and numbers are compared: the business name on the certificate is compared with the application's Company Name and, when the form has the Legal company name template, with the legal company name too — a match with either is enough. Company-type endings are ignored, so “Acme Supply LLC” and “Acme Supply, Inc.” count as the same name; a different name is still flagged. For a buyer in the United States, a state permit or registration number on the certificate is not compared with a federal EIN in the Tax / VAT ID field (they can never be equal), so that difference is no longer flagged. Two different EINs, or two different state numbers, are still flagged. Only certificates uploaded or re-checked from now on are compared this way.
Each certificate carries one of five statuses — collected, verifying, verified, flagged, or needs review. Certificate review is available on the Growth and Pro plans.
On Pro, existing customers can also renew certificates themselves through a secure self-service link, with automatic expiry reminders — each renewal reviewed the same way. See the Certificates Guide.
For the full walkthrough — what each status means, reading confidence, approving a flagged application, your responsibilities, and how documents are processed — see the Certificates Guide.
Business Verification (KYB)
From a company's detail page you can run a business-registry check (KYB — know your business) against the official company register for the company's jurisdiction. Enter the registration number, pick the jurisdiction, and B2B Onboard looks the company up, compares the registry's official name, registered address, and lifecycle status against the details you hold, and surfaces anything that doesn't line up.
It is decision-support, exactly like certificate review: the check flags discrepancies for you to review — it never approves or rejects a company for you, and it never blocks anything. A human (you) always makes the call.
Covered registries:
- Denmark — CVR (Det Centrale Virksomhedsregister, the open Danish business register)
- Norway — Brønnøysundregistrene (Enhetsregisteret, the open Norwegian entity register)
- France — the open company register
- Finland — the open business information system
- Czechia — the open business register
- Brazil — the open CNPJ register
- United Kingdom — Companies House (the free public company register)
- New Zealand — the NZBN register
The first six registries are open and always available. The United Kingdom and New Zealand registries need API access, which is already configured. Additional registries (for example Australia and Ireland) appear in the jurisdiction list once their API access is configured.
The result carries one of these advisory statuses: Verified (the registry confirmed the company and nothing was flagged), Flagged (a name/address mismatch, an inactive registry status, or a duplicate VAT/email/address elsewhere in your shop needs a look), Pending (the check hasn't completed yet), Not found (the registry has no company for that number — check the number and jurisdiction), or Unavailable (the registry couldn't be reached or isn't configured — verify manually and re-check). A plain-language match confidence band (High / Medium / Low) summarises how closely the registry record matched — never a raw percentage.
A free/consumer contact-email domain is surfaced as an informational signal on the KYB card for context; on its own it does not change a Verified result to Flagged or add a worklist row.
Flagged and Unavailable companies appear on the Action required worklist as a "KYB review" row, so nothing slips through. You can re-run the check at any time from the company's KYB card.
B2B Company Creation
On stores with native B2B enabled, approving an application creates or matches a B2B Company in Shopify depending on your matching configuration. The Company includes:
- A contact from the applicant's details
- A location from address fields
- The tax ID from the form submission
On a newly created Company, the applicant also becomes the company’s main contact in Shopify, and their name and phone number are written onto the location’s addresses — unless the address field has Leave the contact’s name off this address in Shopify ticked, then only the phone. On a matched Company the existing main contact is always kept — the app sets one only when the company had none.
If you have configured a B2B catalog in Settings, it is automatically assigned to the new Company. If catalog assignment fails (for example, the catalog no longer exists, or your plan's catalog limit has been reached), the approval still completes and a "Catalog not assigned" warning appears in the success message — the Company is created and you can assign the catalog manually in Shopify.
On the Basic, Grow, and Advanced plans a catalog can't be assigned to a company directly, so wholesale pricing arrives through a market instead: the Company's location is added to your Default B2B market (set in Settings, and overridable per application on the Approve page), and the application timeline records "Added to B2B market". If that step fails, the approval still completes and a "Market not assigned" warning appears in the success message — you can add the location to the market manually in Shopify admin. A company location inherits its market's currency, catalogues and tax settings, so choose a market whose region and currency match these buyers: a Danish buyer added to a market under the Canada region would check out in CAD. If you sell into several regions, create one B2B market per region and pick the right one on each application.
If the form has an address block marked as the billing address, the new company location gets that billing address; otherwise billing is the same as the delivery address. If the form's delivery address is left empty (for example an optional or hidden delivery block), the billing address is used as the location's shipping address too, so the company lands in the right market.
You can also decide per approval whether the buyer may ship to one-time addresses, or only to the location's saved addresses. The Approve page's One-time shipping addresses select is pre-filled from the default in Settings → B2B company; "Use Shopify's default" leaves the new company location's checkout setting untouched. This applies to newly created companies only — an existing company's locations are never reconfigured.
If company creation fails: Company creation works best with a valid phone number in international format (e.g. +1 555 123 4567) and a recognised country on the address field. If the phone or address data can't be used — or company creation otherwise fails — the customer is still approved and can transact immediately. The company-creation failure is recorded with its reason, a "B2B company not created" warning appears in the success message, and you can fix the data and retry company creation from the application detail page. A "companies need attention" nudge on the Dashboard also surfaces approved applications whose company creation failed so none are missed.
This feature is detected automatically — no setup needed. If your store has native B2B access, Companies are created on approval.
Business details saved on the Shopify company
When approval creates a new company, B2B Onboard also saves the application's business details onto that company as Shopify metafields, in the b2b_onboard namespace. They appear on the company page in Shopify admin and are readable by Shopify Flow, reports, and other apps:
- Business type (
business_type) — from the business-type question on your form - Tax ID (
tax_id) — the tax or VAT registration number submitted - Tax ID verification status (
tax_id_verification_status) —verifiedorinvalid, written only when a registry actually answered - Tax ID verification source (
tax_id_verification_source) — which registry answered (VIES, VATsense, HMRC, ABR, NZBN, Brønnøysund) - Approved at (
approved_at) — when the application was approved - Exemption renewal date (
exemption_renewal_date) — the earliest expiry across the certificates on the application - Application reference (
application_reference) — the B2B Onboard application the company came from
Fields with no answer are left off entirely rather than written blank. Contact details (name, email, phone) and uploaded documents are never written to metafields — business fields only.
Registration number on the company location. For buyers outside the EU and UK, a registration number verified by Brønnøysund, the ABR or the NZBN register — and registered for MVA or GST there — is also added to the company location's tax settings on approval, whether or not automatic tax exemption is on. It never sets a tax exemption, and a number already on the location is never replaced. The application timeline records Registration number added to the company location with the register it came from. (For EU and UK buyers the number is added only together with reverse charge, when automatic tax exemption applies it.)
Approving an applicant into an existing company writes none of these fixed fields: a company you already had is your data, and an approval never overwrites its stored business details. (Your own metafield bindings follow the policy you set per binding — by default they fill only empty values on an existing company, and the Approve page shows the value it will replace before you approve.) The Companies page shows what is currently on each company under "Stored on the Shopify company", read live from Shopify — so if you edit a value in Shopify admin, that is what you see there. If saving the fields fails, the approval still completes as normal; only the metafields are missing, and you can fill them in from Shopify admin.
B2B Company Matching
When company matching is enabled in Settings, the application detail page shows a B2B Company Matching card in the right sidebar for pending applications. The card evaluates three independent signals to determine whether the applicant may belong to an existing B2B Company:
- VAT / Tax ID — high-confidence signal. Matches the applicant's VAT number against existing company contacts' notes.
- Email domain — medium-confidence signal. Compares the applicant's email domain against contacts in existing companies. Freemail providers (Gmail, Yahoo, etc.) are excluded automatically.
- Company name — low-confidence signal. Exact case-insensitive match against existing company names.
The matching card displays one of three states:
- Existing company found (amber) — a high-confidence match was detected. Shows the company name, contact count, and which signals matched. You can choose Add to company to assign the applicant as a contact on the existing company, or Create new to create a separate company as usual.
- Possible match — verify manually (red) — a low or medium-confidence match was found. The same options are available, but Create new is visually emphasised as the safer default.
- No matching company found (blue) — no signals matched. A new B2B Company will be created on approval.
When you add the applicant to an existing company, the Location permissions list always shows the locations of the company you selected, and the contact gets the role you pick at each checked location. If Shopify refuses the role, the application shows Ordering role not granted and the contact can't order until you give them a role in Shopify admin → Customers → Companies.
If you click Approve Application without selecting an option on the matching card, a prompt appears asking you to choose before proceeding.
When VAT auto-match is enabled in Settings and a high-confidence VAT match exists, the applicant is automatically assigned to the existing company on approval without prompting. The matching card still appears on the review page for transparency.
Sync from Shopify (existing companies)
If your store already had B2B Companies in Shopify before you installed the app, open Companies and click Sync from Shopify. The sync is read-only against Shopify — it never creates or changes Shopify companies, locations, or customers. For each company the app doesn’t know yet, it creates an app-side company record plus a pre-approved application (labelled Shopify sync in the Applications list), so certificate collection and review work exactly as they do for companies onboarded through an application.
The sync records every contact and every location of each company (as references — the data itself stays in Shopify). The results card shows how each company was handled: Created, Skipped (already in the app), No contact, or Failed. Certificate links go to the company’s main contact (or its only contact, when just one exists). A company with no usable contact is still tracked — add a main contact in Shopify and run the sync again, and it becomes link-capable with no duplicates. Re-running is always safe: already-synced companies pick up newly added contacts and locations, or are simply skipped.
Timeline and Audit Trail
Every action taken on an application is logged with a timestamp and the actor who performed it. The timeline on the application detail page shows the full history, including:
- Submission — when the customer originally submitted the form
- Status changes — approvals, rejections, and information requests with who made the decision
- Application data edited — which answers a reviewer changed, with the previous and the new value
- Notes — any messages sent to the customer when requesting more information
- Customer responses — when the customer replied to an information request and what they provided
- Note added — a note added by the Add internal note action in a Shopify Flow workflow, with “Shopify Flow” as the actor
- Certificate downloaded through a Shopify Flow link — each download of a tax certificate through a certificate download link
This audit trail gives you a complete record of every interaction, which is helpful for compliance and team handoffs.
Weekly report
Open Reports in the app navigation to see how many new applications one of your registration forms received in a period, and how that compares with the period before. Reports are available on the Growth and Pro plans; on other plans the page shows where to upgrade.
- Date range — the page opens on last week. Click the date button to pick a preset (This week, Last week, Last 7, 30 or 90 days, Month to date, Last month, Quarter to date, Year to date) or a custom range: type a start and end date or click them in the calendar, then click Apply. A custom range can be up to 366 days and can’t end in the future. “Last N days” ends yesterday. Dates follow your store’s time zone (Shopify admin → Settings → General).
- Comparison — every number is compared with the previous period of the same length, right before the one you picked (for Last 30 days, the 30 days before). Set Compare to to Previous year to compare with the same dates a year earlier instead (for Year to date, 1 January to today’s date last year). The line under the filters reads “Compared with” and its dates.
- Weeks follow your store’s country — a week starts on Monday, or on Sunday where weeks start on Sunday (the United States, Canada, Brazil and others). This applies to This week, Last week and the weekly email.
- What counts — every application submitted during the period, whatever its status. The status shown is the status today, so an application that arrived last week and was approved this morning counts as approved.
- Totals — Received (with the previous period’s number and the change), Approved, Rejected and Pending. Pending includes applications still under review, waiting for more information, or held because the monthly plan limit was reached.
- Not counted — applications in quarantine (suspected spam) are left out of every number and table and shown as one line, “N in quarantine”. Sample applications, CSV imports and companies synced from Shopify are never counted.
- Breakdowns — one table per breakdown, with this period and the previous period side by side. By default the report breaks down by country, by US state (shown when at least one application came from the United States) and by each of the form’s dropdown questions. Every answer option of a question is listed, followed by “No answer” and by any answer that is no longer an option on the form, marked “(old option)”. The Share column shows each row as a percentage of the applications that table counted this period (a multi-select or list can add up to more than 100%).
- Several forms — use the Form menu to switch between registration forms. Your default form is shown first.
Choose your breakdowns
The Reports page has two tabs: Report shows the numbers, Breakdowns decides which tables the report shows for the selected form. The choice is saved per form and also shapes the weekly email.
- Automatic (the default) — country and US state from the delivery address, plus every dropdown question.
- Choose breakdowns — tick exactly the tables you want, then click Save in the save bar. Choose at least one.
- Address — Country and US state. When the form has a business (billing) address, pick which address they come from under Address used: the delivery address (the one used for the Shopify company location) or the business address.
- Form questions — dropdown, multi-select and checkbox questions. A multi-select table counts every option an applicant picked, so its rows can add up to more than the total. A checkbox table shows Yes and No.
- Set on approval — the metafields your reviewers fill in on the Approve page (set them up under Settings → B2B company), such as a discount group. These tables count approved applications only; an approved application without a value shows as “Not set”, and beyond the ten most common values the rest are grouped as “Other values”. When the metafield definition in Shopify has preset choices, every choice is listed in the definition’s order, including choices nobody has yet.
If you later delete everything you chose from the form, the report goes back to Automatic. Free-text questions are not broken down.
Weekly report by email
Turn on Send me a weekly report of new applications under Settings → Notifications (Growth and Pro) to get the same report by email at the start of every week, around 07:00 in your store’s time zone: on Monday, or on Sunday where weeks start on Sunday (such as the United States). It covers the week that just ended, with one section per registration form showing the breakdowns you chose on the Breakdowns tab that had applications that week or the week before, and goes to your notification email addresses. A week without applications still sends a short note. The email contains counts only — no names, email addresses or company names — and links to the Reports page, opened on that week. It is off until you turn it on, and you can turn it off at any time on the same page.
Export to a spreadsheet
To work with the applications themselves, click Export CSV at the top of the Report tab. The export covers the selected form: pick a date range (from and to, in your store’s time zone, up to 366 days; it starts as the page’s date range) and the statuses to include (Pending, Info requested, Held, Approved, Rejected and Quarantined; all but Quarantined are ticked to start with), then click Export. When the file is ready, click Download CSV. The file has one row per application and opens in Excel, Numbers or Google Sheets. The first columns are the application ID, the submitted time, the status, the decision time and the reviewer (approved and rejected applications only), and the hours from submission to decision. After those comes one column for each question on the form, in form order, with the question as the column title. Checkboxes read Yes or No, multi-select answers are separated by commas, an address is on one line, and uploaded files are listed by name only. Times are in UTC. Applications erased at a customer’s request show [REDACTED] in every answer column, and sample applications are left out. The file contains personal data (names, email addresses and every answer), so store and share it with care. The download link works for one hour, and you can download the file again for 7 days from Settings → Data export, where it is listed under Recent exports as “Applications spreadsheet”. You can request up to 10 spreadsheet exports per hour.